
French Link with Tape Cover – Part 2
At this point you should have the front cover completed and it should be thoroughly dry.
The next step is to get the signatures ready for sewing. If you are already familiar with this series of steps just skip ahead to about 2:25 in the timeline.
Measure out the thread you will need. A general rule of thumb for how much thread you’ll need is one length per signature plus extra for the beginning and ending tails. I’m always generous in this regard because I hate getting to the end only to find that I don’t have quite enough thread, forcing me to add a piece just to finish off the binding.
Before you start sewing you might want to mark the signatures so they stay in the correct orientation. As you are sewing you’ll be turning and manipulating the cover and signature that you’re sewing at the moment, so it’s very easy to get confused about the placement of the next signature.
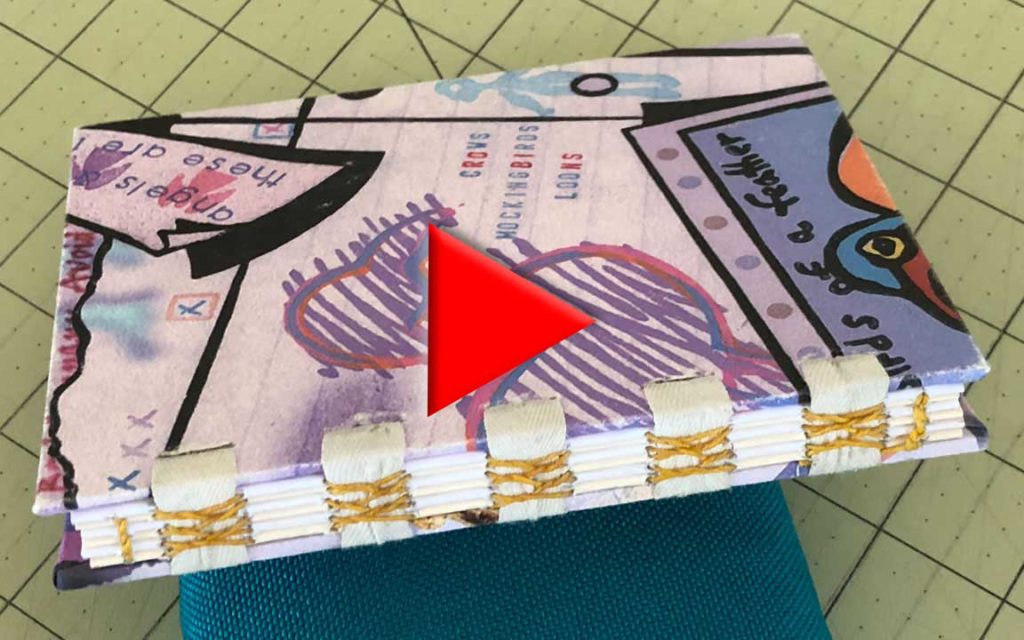
Orient the top cover and the first signature. Sew into the first hole in the first signature from the outside. As you pull the thread through leave a tail of at least three inches behind. You will need this excess later. Sew back out through the second hole. The next stitch will wrap around the tape and then come back in through the third hole in the signature.
As you are sewing the signatures together you will constantly be doing the dance of disentangling the tapes from the thread. Just be mindful of where the thread needs to be in relation to the tape. Continue this process down the length of the first signature. When snugging up the thread, be sure to pull parallel to the spine to keep from ripping the paper. Don’t worry about snugging up the tapes yet.
When you get to the last stitch in that signature your thread should end up on the outside of the spine. Now you can snug up and straighten out the tapes.
Place the next signature, making sure the orientation is correct. Sew in through the first hole and out through the second. Now comes the first French Link stitch, where you link to the stitch in the signature below. Simply loop through the stitch in the signature below.
The obvious way to do this is to simply push the point of your needle underneath that stitch. However, I don’t like to do this because it’s very easy to pierce the thread or the tape with your needle and not even know it. The linking stitch is self-adjusting once you sew in through the next hole – it will center itself on the stich it is looped around. But, if you accidentally sew into the thread or the tape you will end up with a problem that you might not notice until it is too late to fix it.
So, instead of using the point of the need I turn the needle around and lead with the eye of the needle. This way there is never a risk of accidentally piercing part of the thread I am looping around. You can certainly choose to use the point of the needle, just be aware and careful not to grab what you don’t intend to grab. It’s also possible to use a blunt-pointed needle, but I think this makes it very difficult to sew in and out of the signatures.
Sew back into the next hole in the second signature and you have made the first linking stitch. Keep your stitches taught but not overly tight. If you make them too tight your books will not lie flat. Repeat this process until you get to the end of the signatures. Your last stitch should end up on the outside of the second signature.
Now you’ll want to tie off the loose end. There are two ways to do this. One is to simply tie a double knot. This is the simplest way but if you are creating a book with an exposed spine, the knot will show. You can see a method for hiding the knot in the brief video here.
If you chose to simply tie a double knot you’ll want to queue up signature three and sew in through the first hole. If you’ve followed the instructions for hiding the knot inside then you’re already inside of signature three.
Go back out through the second hole in the signature, and make the next linking stitch. This time you’ll link through the stitch in the second signature. Be careful to go through only that stitch, don’t catch the stitch below it.
Again, you can certainly do this with the point of the needle but be careful not to pierce the thread or the tape. As before, my preferred method is to use the eye of the needle instead. Link through this thread, make sure you are wrapping around the tape and then go back in through the third hole in the signature.
Continue this same process with the rest of the signatures, being sure to complete a kettle stitch at each end to anchor the textblock.
Continue this pattern of sewing through the link in the signature directly below the signature you’re currently in. Once you get to the end you will need to anchor that end of the book with a kettle stitch. This keeps the book from being too loose.
Create the kettle stitch by passing the needle under the stitch in the first holes that join signatures 1 and 2 and then back through the loop that is formed. Tighten this knot, add the next signature and repeat this entire process with the remaining signatures, looping under the previous stitch to create the linking stitch and ending every signature with the anchoring kettle stitch.
Once you have sewn all of the signatures in this same fashion you will finish off this phase of the textblock with a double kettle stitch. First, complete a kettle stich between the previous two signatures as you have been doing all along. Then, make a second kettle stitch between the final two signatures. You can hide the thread by sewing back through the first hole and then tying it off inside.
The final part of this binding is to attach the second cover. If you haven’t already prepped it do that now by gluing on the paper and mitering the corners. You’ll also need to cut the same slits on the spine-side of each grave, just as you did the front cover.
Place the cover on top of the bookblock and bring the tape up and over. You’ll force the tape through the corresponding slit in the cover, using an appropriate tool, just as you did with the first cover. Again, a pair of tweezers can be very useful for this task. You only need to get enough tape through the slit so that you can grab it with the tweezers or your fingers.
Pull all of the tapes through in this same manner. Pull the tapes from the inside and tighten them up and straighten them out. Pull them just tight enough that you have the same amount of space between the board and the textblock as you do with the front cover. Don’t over-tighten these tapes or your book won’t stay closed.
Find a book that is about the same height as your textblock to work on. This gives you something to push against without changing the positioning of your tapes.
Lay the tapes out flat and mark the outer edges of the graves on the tapes. Trim the tapes with a pair of scissors. Next, dab glue into the graves and press the tapes down, just as you did on the front of the cover.
Glue the tabs into place, being careful to match up the markings that you made earlier before you cut them out. Press them down and burnish them with a bone folder or other tool to remove any ridges.
Next you’ll glue all of the flaps down, following the same procedure you used on the front cover. Use a barrier paper to spread the glue on, and crimp the corners, just as you did before. Once you have all of the flaps glued down, glue the endpaper into place.
Finally, place some waxed paper and an absorbent paper such as blotter paper in between the cover and the textblock, place under a heavy weight and allow it to dry thoroughly. The waxed paper will block any moisture that the blotter paper doesn’t absorb and keep it from warping the pages of the textblock.
Your book is done!

