
I created these slipcase worksheets to make it easier for you to create a slipcase that fits your book perfectly.
Click on each of these images to be taken to the download page for that worksheet. Depending on the browser and OS you’re using you should be able to right-click, or Control-click, on the image there and download to your computer.
The images are 8 1/2 x 11 and should print readily from a desktop printer.
Imperial Measurements (Inches):
1. Bookboard

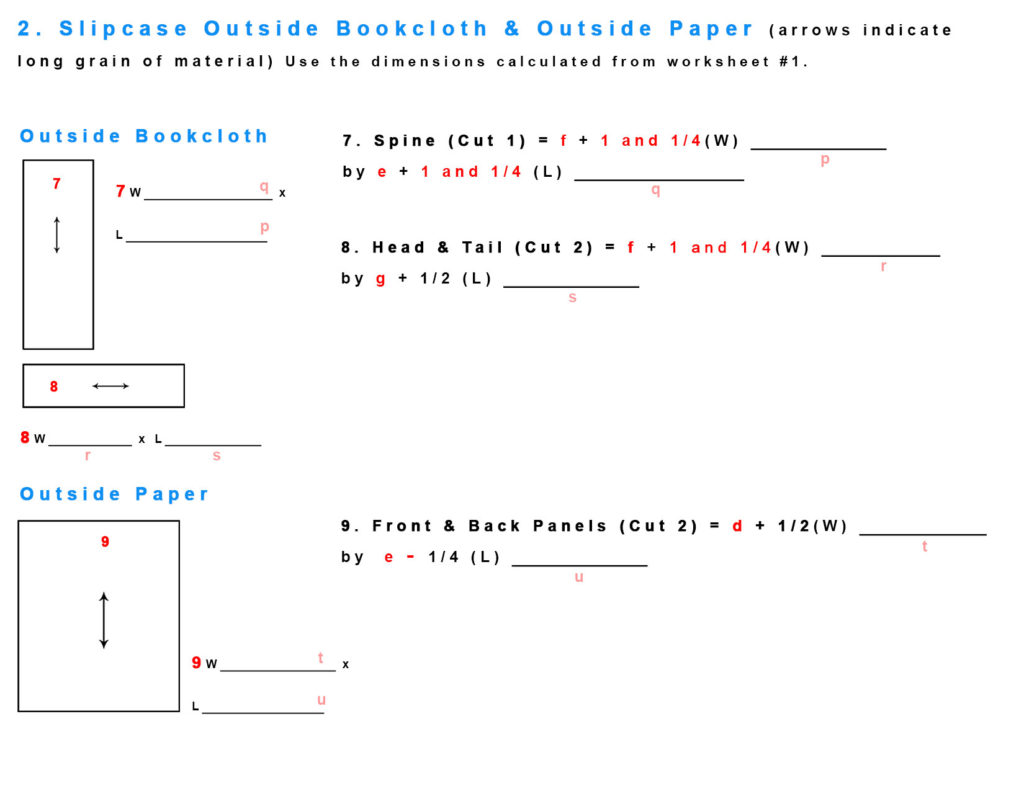
2. Paper and Bookcloth
Metric Measurements (Millimeters):
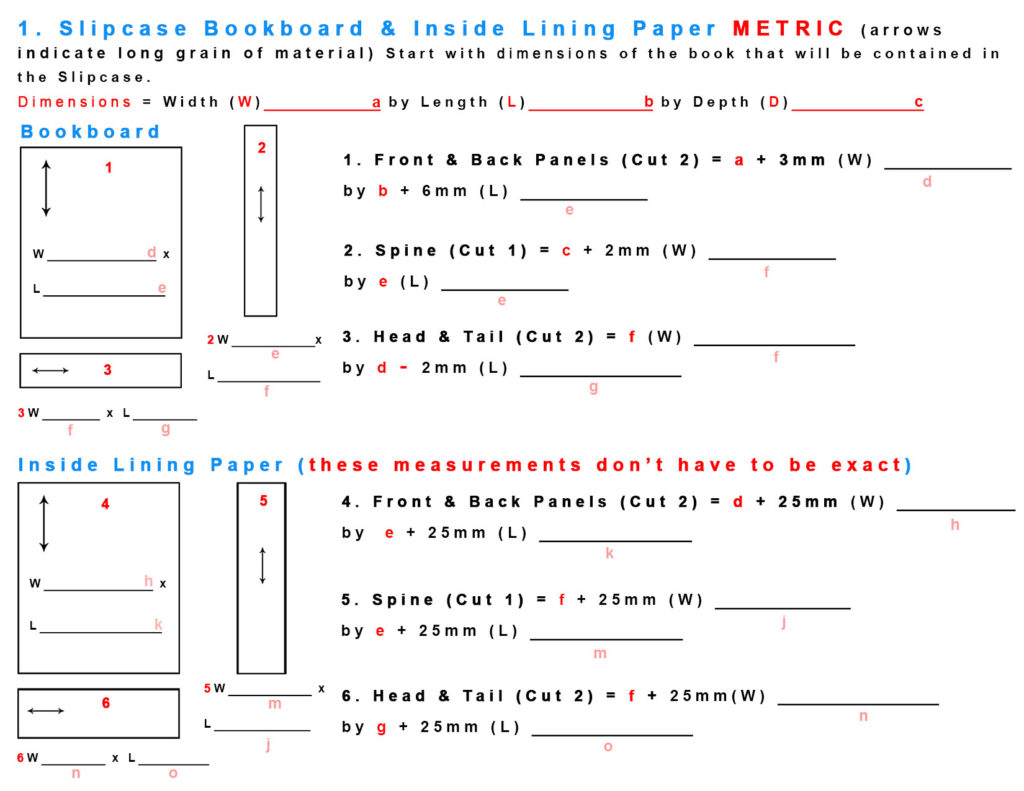
1. Bookboard
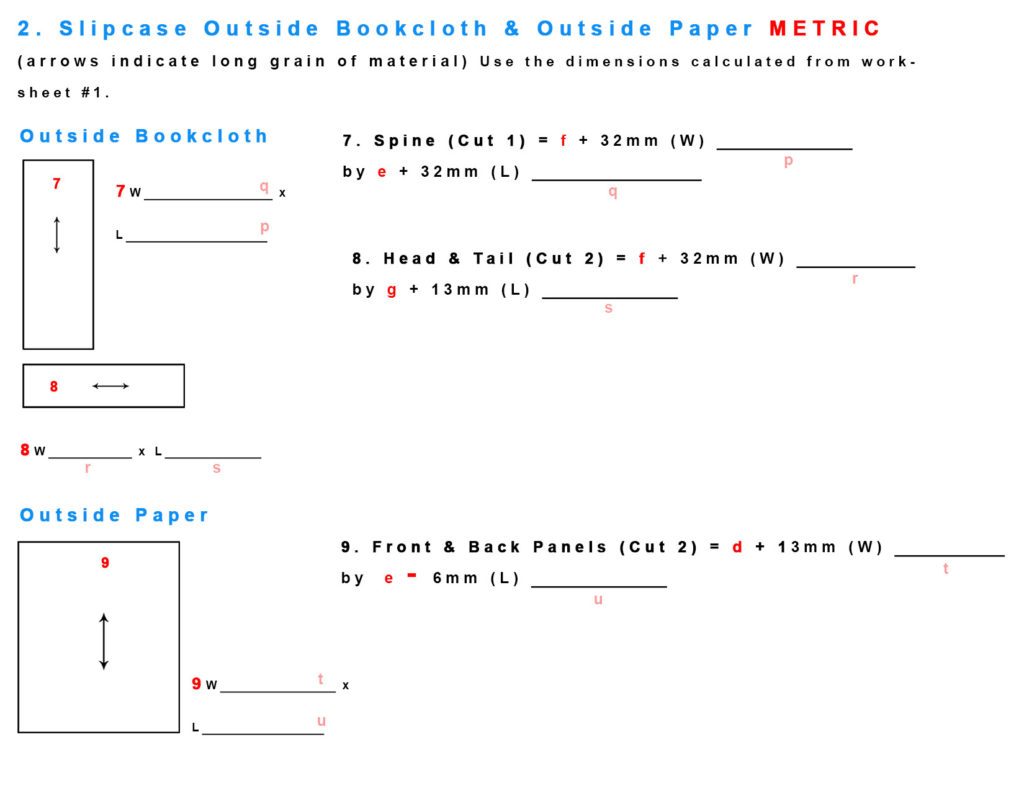
2. Paper and Bookcloth
Instructions for Filling Out the Slipcase Worksheets
Follow the written instructions or just watch this brief video to see how to use the worksheets.

Watch this video for help filling out the Slipcase worksheets.
The ultimate goal with these worksheets is to have the left sides fully filled out, giving you a road map for cutting all of the materials needed to create this slipcase.
First, Get the Measurements of Your Book
Start with Worksheet number 1 – the bookboard and Inside Lining Paper. The first thing you need to do is take the measurements of the book that you’re going to put in the slipcase. These measurements need to be as accurate as possible for the finished slipcase to be successful.
You’ll want a ruler that measures sixteenth’s of an inch, at least. My ruler measures sixteenth’s of an inch but when necessary I can visually cut a sixteenth in half and make it a 32nd.
If any of the edges are slightly rounded, like the spine of this portfolio, measure using a thin piece of bookboard against that edge. Measure up to the edge of that piece of bookboard. This will give you a more accurate measurement.
You can also use that piece of bookboard to get an accurate measurement of the depth of the book. Just make a mark right where the book hits the piece of bookboard and then measure that mark.
Start Filling Out the First Worksheet
So, once you have these three important measurements, fill in the Width, Length and Depth blanks on your worksheet. These are the numbers that everything else will be based off of.
Now just start working your way down the worksheet. Any place you see an a, b or c you can fill in, because you know those values now. The first formula has you add 1/8th of an inch to your width, or ‘a’ value, which, in my case is 8 ands 1/8th. So you end up with 8 and 2/8ths.
You can leave the figure just like this or reduce the fraction to 1/4th, if you remember how to do that.
So now you know the value for d and you can fill that in wherever you see it on the worksheets.
Simple Fractional Math 🙂
Continue in this manner with the rest of the formulas on this page. You will occasionally run into situations where the fractions you need to add don’t match, so you’ll need to convert those first. For those of you who don’t remember your fractional math, here’s a quick refresher.
In this example you need to add 1/8th and 1/4th which you can’t do until you get a common denominator, the lower part of the fraction. The easiest way to do this is to multiply them by each other, which would result in 32nds, but that isn’t always the best way.
Lowest Common Denominator
A better way is to just find the lowest common denominator. With the sort of fractions you’ll be dealing with this should be pretty easy. For instance, in this case, it’s pretty easy to turn fourths into eighths by just multiplying the top and bottom by 2. This turns 1/4th into 2/8ths, and now you can add them together.
Once you have the same denominator you can just add the numerators – the top part of the fraction – to get your answer. Now that you have the answer just fill in that value any place you see the appropriate letter.
Work your way through the rest of the sheet in the same manner. By the way. the math for the second part of this first sheet – the liner pieces for the inside of the slipcase – is very simple. You’re just adding 1 to each of the requested figures and these measurements don’t even have to be very precise, because you will be trimming these pieces later.
Finish Up with the Second Worksheet
Fill out the second worksheet in exactly the same way. Many of the figures that you’ll need will come from the first worksheet.
Once you’ve worked your way through both worksheets you’re ready to cut your materials. By the way, I will often complete these worksheets twice, just to double-check my math. It’s easier to take a little extra time at this step rather than discover, after you’ve cut and glued things together, that something doesn’t fit right.

