
I don’t know why this book format is called a guest book, but it’s quite easy to make and has lots of potential for creative additions.
The simple supply list and minimal skill level make this a fun project for kids.
For the basic structure the only supplies you need are paper, scissors and glue. For this tutorial I use a glue stick but, as always, if you are making an artist book or something that you want to last, use PVA glue or some other PH neutral adhesive.
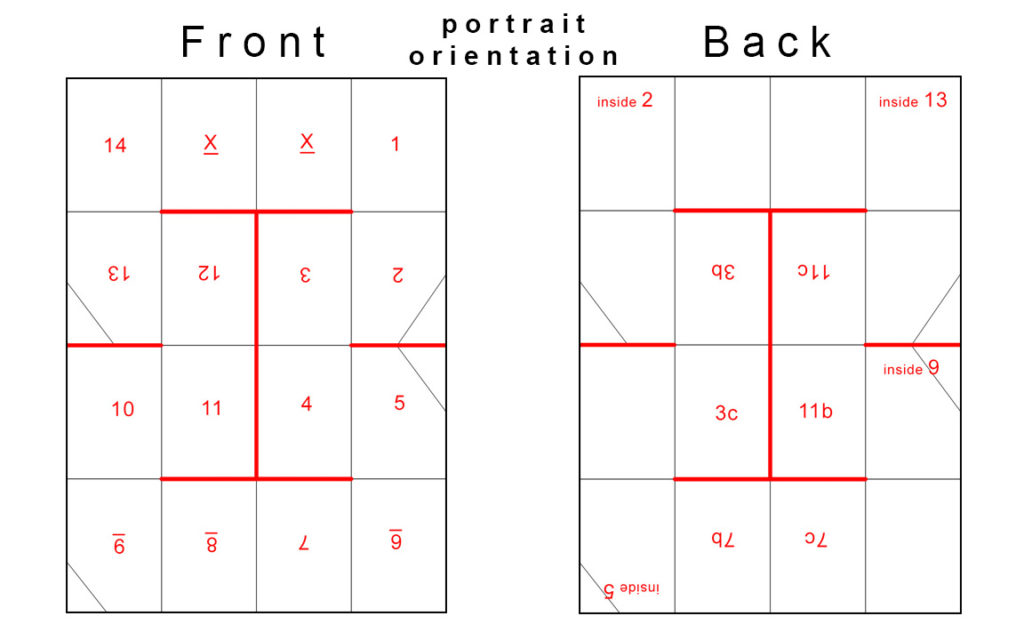
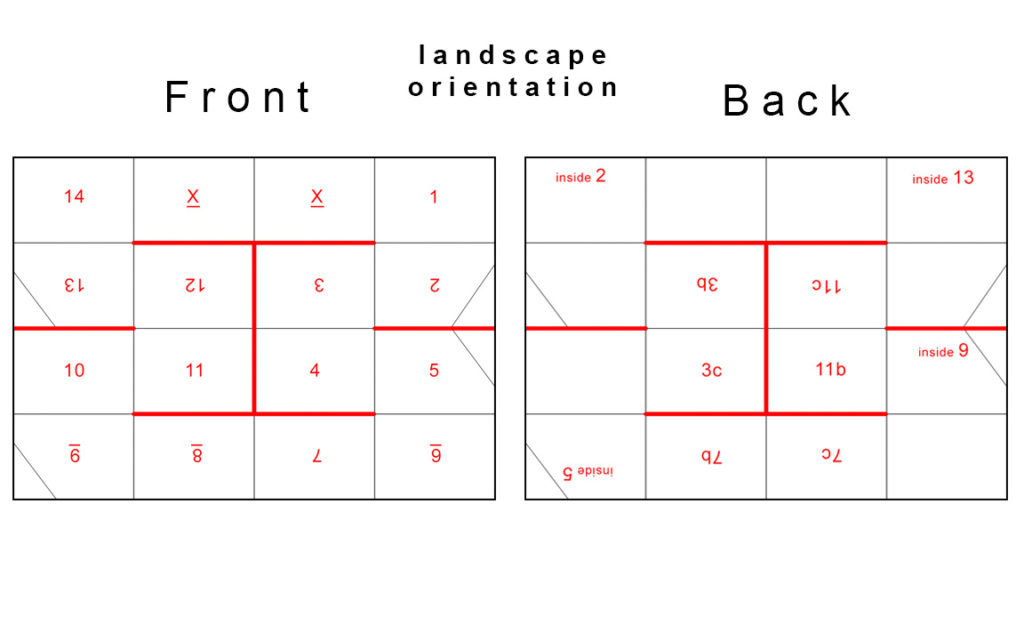
From an 8 ½ x 11 piece of paper you can make either a horizontal or vertical version of this book. If you want a square book, start with a square piece of paper.
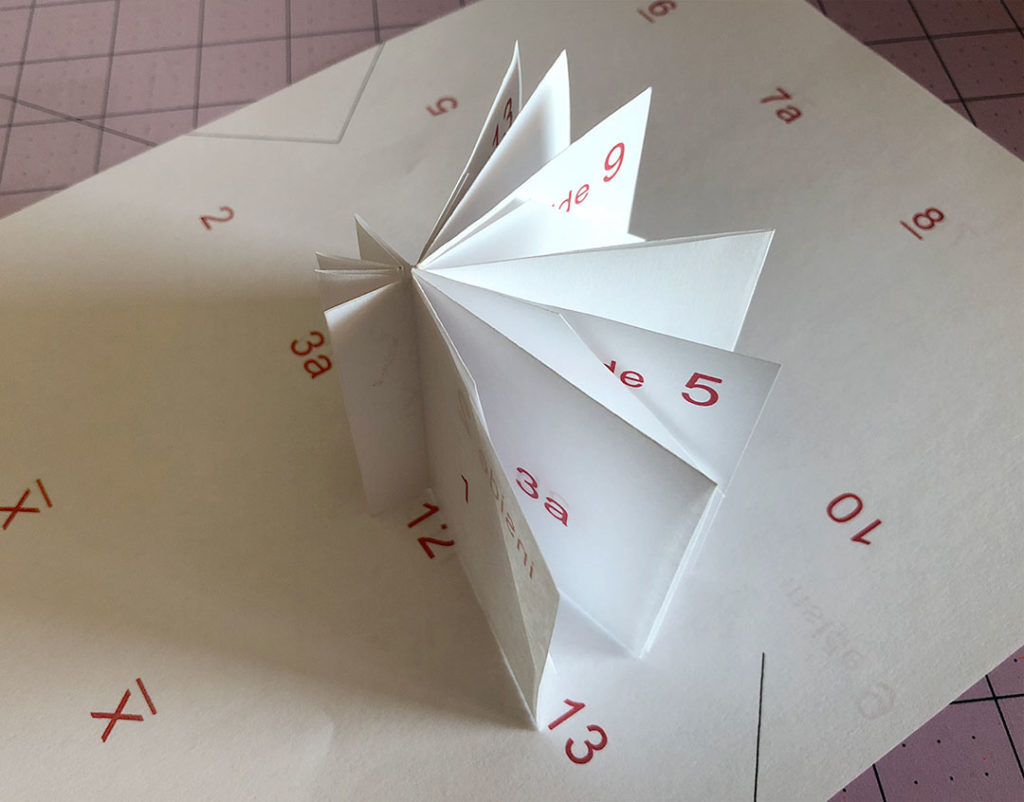
Once folded you end up with this interesting fan-shaped structure at the spine. You can leave it this way or glue these pieces together to make a stiffer spine. The resulting folds also give you some pages that can be turned into pockets.
When I’m working on a new book I always make lots of templates from cheap bond paper, trying to decide on the format and making sure I understand the order of the pages. I often print my pages before folding so I want to make sure they end up in the right order with the images in the correct orientation.
Create your own working template or make use of these. This shows the front and back and the correct orientation of your images, if you plan to print your book before folding it.
 To make this book start by folding the page in half. Turn the paper around and fold the one side in half again. Turn it over and fold the other side in half. The paper will now be folded in quarters.
Open the folded paper all the way open and fold it in half again the other direction. Turn it around, fold the side up, turn it over and fold the other side up, just like you did the first time around.
Open the paper again. Now you should have mountain and valley folds going both directions, dividing the paper into 16 equal segments.
The next thing you’re going to do is cut the paper along the fold lines where you see the heavy red lines on the template. You can do this with a straight edge, and a scalpel or razor blade, or with a pair of scissors.
If you’re using scissors it’s easier if you fold the paper and then cut. I’m making the creases a little sharper here so I can see them and be sure that I’m cutting right on the fold. You can be more accurate and careful with a straight edge and a blade, but if you’re working with kids, using scissors for this step is probably easier and safer.
Next, once you’ve made the cuts, fold the middle pieces that you cut open to each side, like you’re opening shutters. Then fold the paper in half, toward you. Fold the edge closest to you back up, turn the whole contraption over and fold that side up, as well.
Now accordion fold the entire package you have created, making sure that your front page, or #1 segment, is on top of the accordion.
If you have folded this correctly, the profile of the folded book should look like this:
There will be two folded pages in the middle that you will separate by pulling the outside one out. If you are following along using my template these would be the pieces marked with Xs. This part will end up becoming the spine.
Pull this piece all the way out and flatten the fold. Fold this piece in half, open it and fold it in half the other way, so the fold goes both ways.
Fold the first half in half again, folding it both forward and back so the fold goes both ways. Your reason for doing this will be clear in a minute. Fold the second half in half, again folding it both forward and backward. When you are done with all this folding, that piece you pulled out should have a fold every quarter.
Here’s another look at these folds on a larger version, so it’s easier to see.
Now open this piece up and manipulate the folds so that you end up with the configuration you see here. This folding pattern is what gives the spine this interesting fan shape.
At this point you have some choices with how you want to finish off the book. One thing you should do is apply some glue along the folded edges inside the spine to keep the book from flopping apart. This is a little awkward on a smaller book but you should be able to do it with a glue stick or with glue on your finger. PVA glue is a very good option for this step because it stays flexible after it dries.
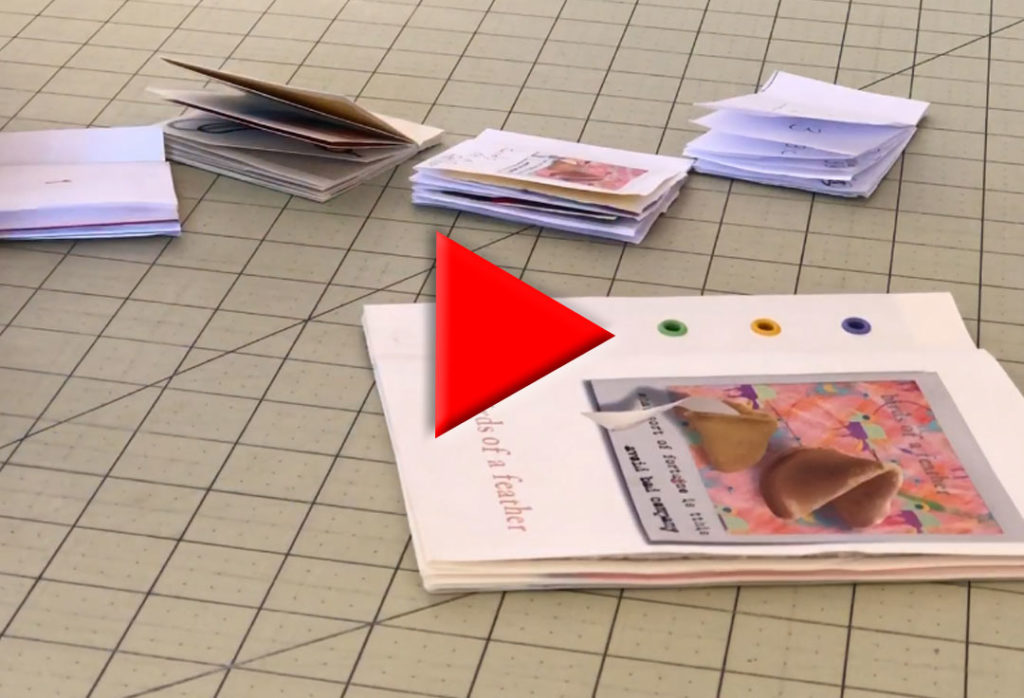
You can also cut corners off of certain pages of the book to give yourself pockets. You’ll see some triangles on my template that show which corners can be cut. The back of the template also indicates the parts of the backside that will show if you do this, giving you the opportunity to decorate those back pages. You can also cut apart some of the pages to make more pages. Or, you can glue those pages together to make a single heavier page.
You can keep the spine edge open so it has that fan-like effect, or glue those pieces together to make a heavier spine. If you wanted to make a book with more pages just make another one and glue the spines together. In my larger example here you can see that I added eyelets to the spine to add a bit more weight as well as a decorative element. There are lots of creative things you can do with this book form.
So that’s all there is to making the so-called guest book.

