
Click to Watch the Caterpillar Stitch Video Tutorial
Caterpillar Bookbinding Stitch – Part 1
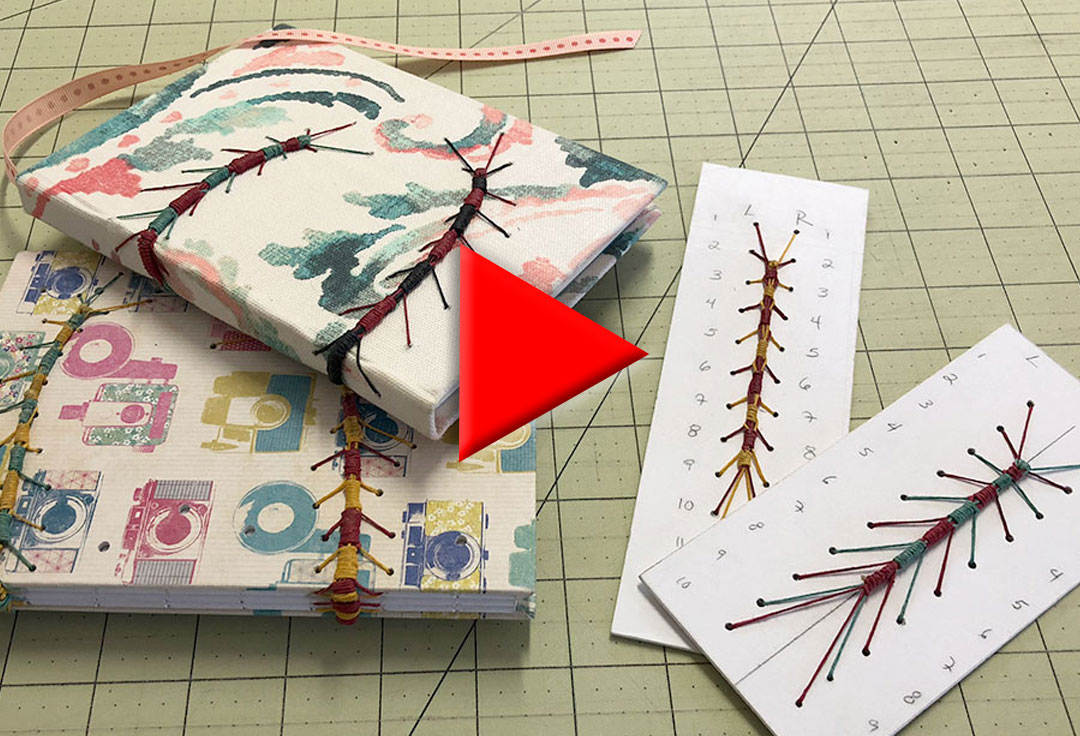
This is known as the caterpillar bookbinding stitch but it arguably looks a lot more like a centipede. You could also customize this bookbinding stitch so that it looks like a leaf or some other abstract organic form.
I think there are three distinct ways to use this stitch. One is as a purely decorative element on the cover of a book or on a box, something that has nothing to do with the binding.
Second is as a binding stitch for an exposed spine book, similar to a Coptic Stitch or French Link binding. If using it this way you might want to consider incorporating a Coptic or French Link stitch with it, just to keep it from being too loose. This sometimes happens if you’re just using the caterpillar stitch by itself. It’s difficult to get the caterpillar stitch tight enough to stabilize the book without making it so tight the book won’t close.
 Lastly, you can use it as a sort of hybrid of those two, using it to wrap around the front and back of a cased-in book. In this case you need to incorporate it into the spine before adding the textblock, and it isn’t actually part of the binding of the textblock. I guess this is my favorite use of it. I like how it wraps around the book but the binding itself is dependent on some other more stable technique, in this case a traditional casebound book.
Skip Ahead if You Already Know the Basics
If you are already familiar with the caterpillar stitch and just want to see how to run it across a spine, or incorporate it into the binding itself, jump ahead to Part 2 see those techniques.
Something to take note of here – the backside of the caterpillar stitch always results in a ladder effect. You can incorporate this aspect of the stitch into your book as a decorative element, or you can hide it completely under the endpapers. I’ll show you a technique for hiding the stitch in the instructions in Part 2.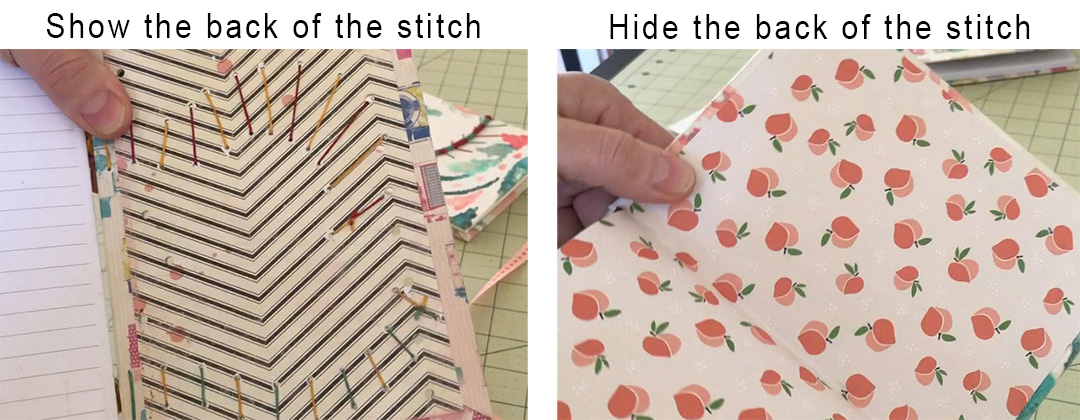
First, Practice!
If you haven’t done this stitch before I strongly suggest you do a sample of it before diving into the work on a book. It will help you to get a solid understanding of the stitch first.
This is one of those stitches where I think it’s useful to have both written instructions and a video, so you can also watch how it goes together. So, I have created these written instructions, with diagrams, that are available here. You can use them from the website or download them and print them off.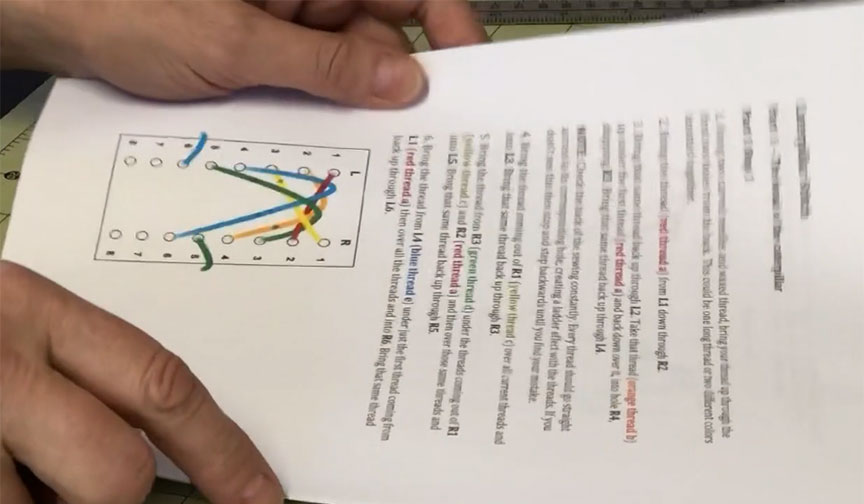
Gather Your Materials
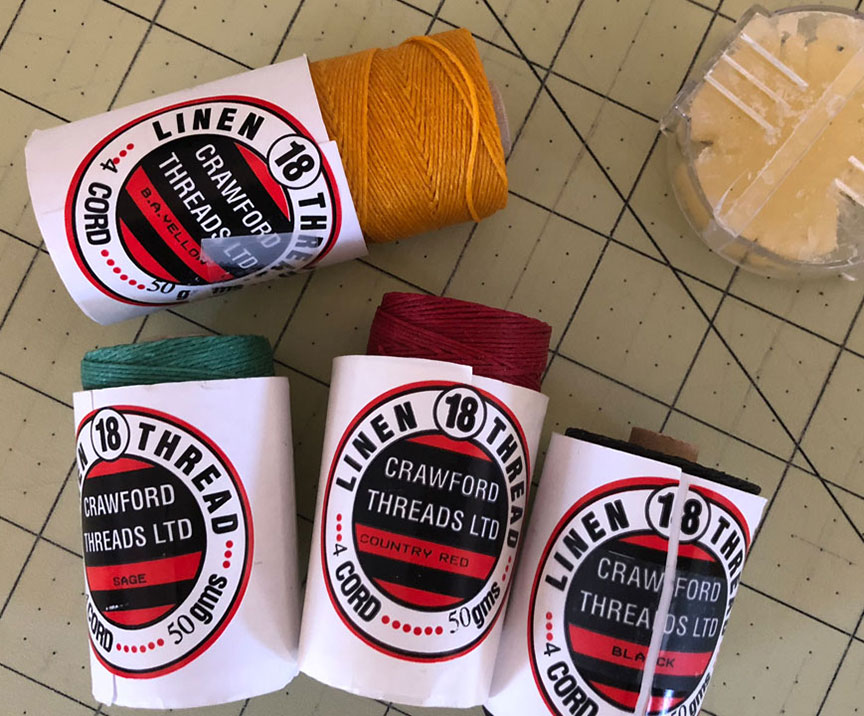 I would suggest you use waxed thread for this stitch, for at least two reasons. First, the waxed thread will help hold the various stitches in place as you move on to the next step. Secondly, you will start out with very long threads and using waxed thread will keep them from getting too tangled. You can wax your own thread or buy it pre-waxed. I’m using a 4 cord pre-waxed linen thread that is available from any bookmaking store.
Also, curved needles really make working on this stitch so much easier. However, if you don’t have curved needles, you can still do this stitch with straight needles. Either way, you’ll need a pair of needles. You’ll also need something sharp to poke holes in the bookboard. An awl works well for this. I also have a little tool from a medical kit that I use.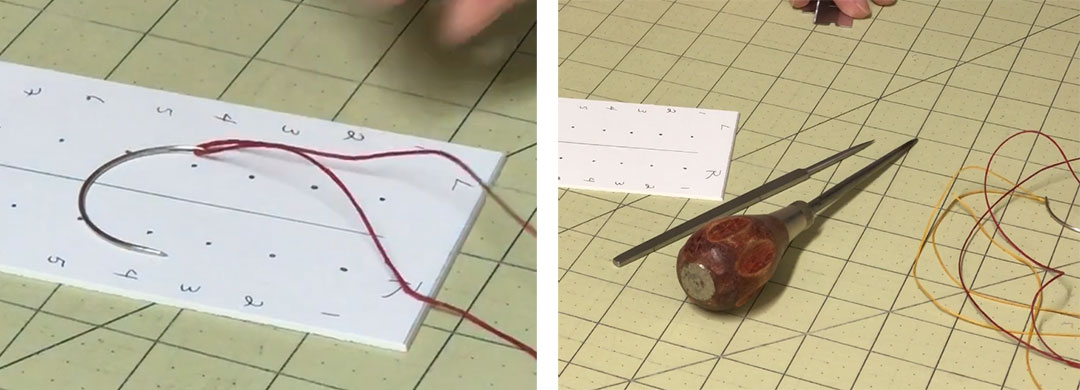
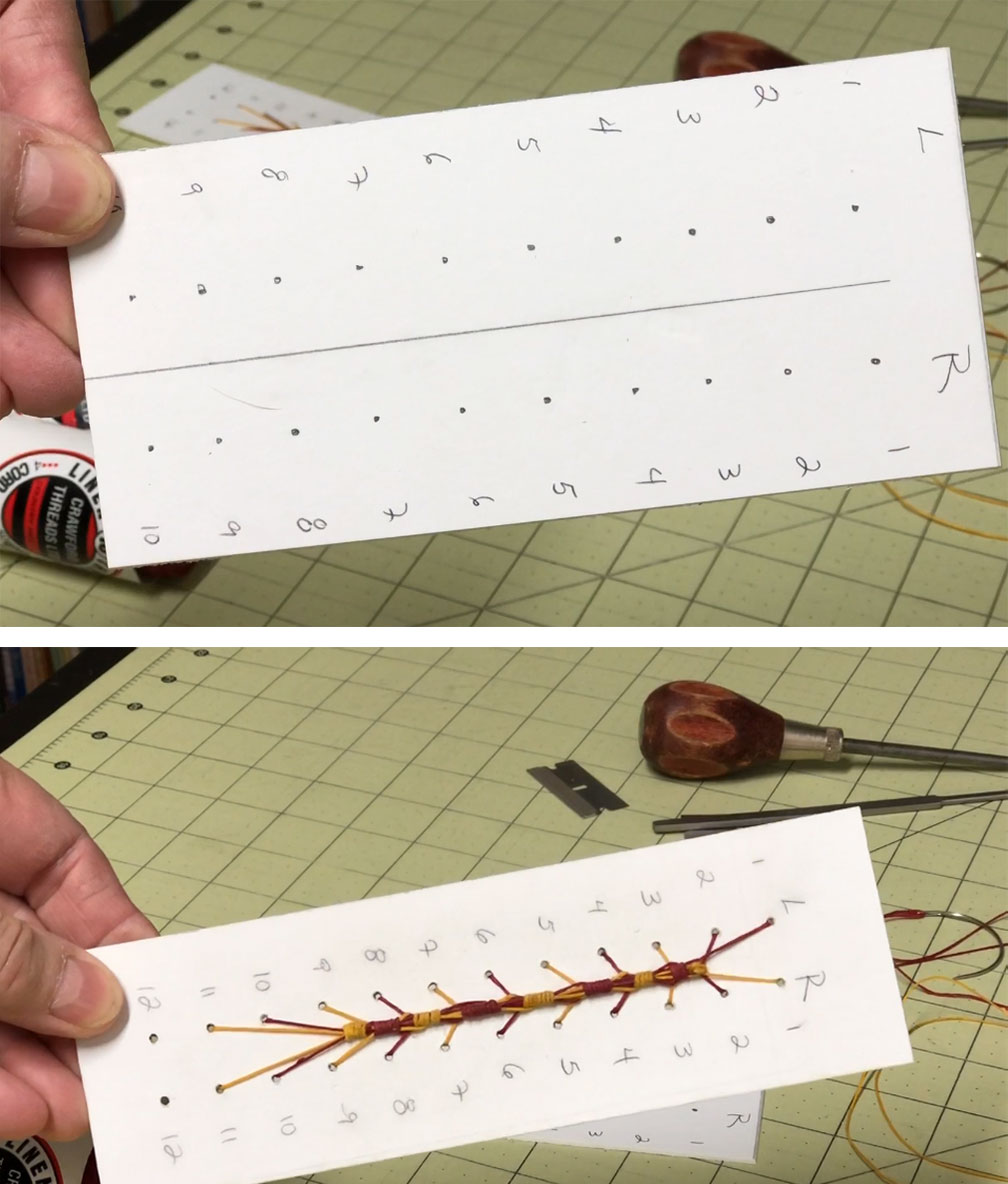
Create a little board like this, marking the left and right sides and numbering the dots where you will make holes. Use the same or similar board that you’ll be using for your book, so you can get a feel for the whole process.
Prepare Your Practice Board
Punch holes at each dot, making sure you go all the way through. My method is to start the hole with an awl and then finish opening it up with the finer medical tool, but you can do all of this with just the awl, or even a very large needle.
One result of punching the holes is that all that cardboard you’re pushing around has to go somewhere. Where it goes is onto the back side of the board, creating these little mountains of cardboard around the holes. You can just leave those there, but I personally don’t like them very much and I think they mess up the appearance of the book, so I get rid of them. 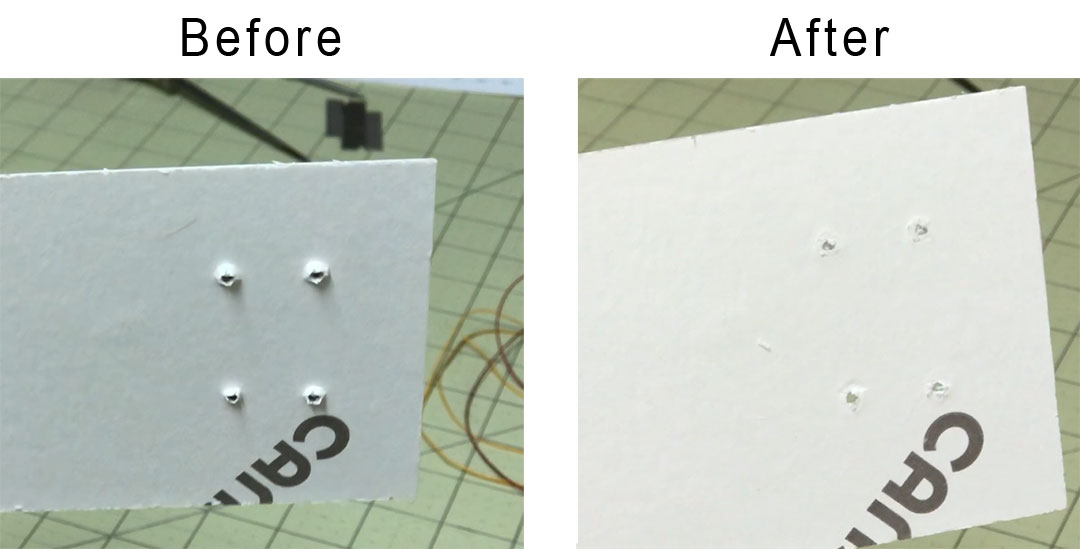
I just use a razor blade held parallel to the bookboard and slice them off. You could also use sandpaper and lightly sand them off. This will leave you with a smooth surface which I think is a better result no matter how you are finishing off your book.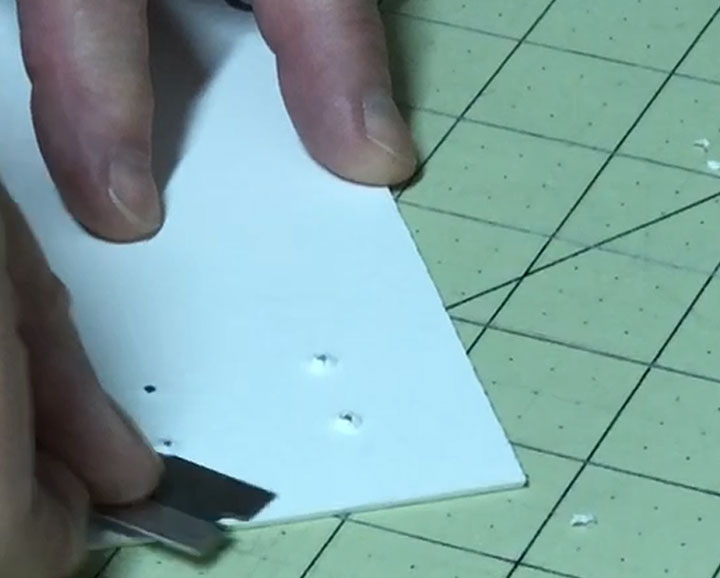
Start Sewing!
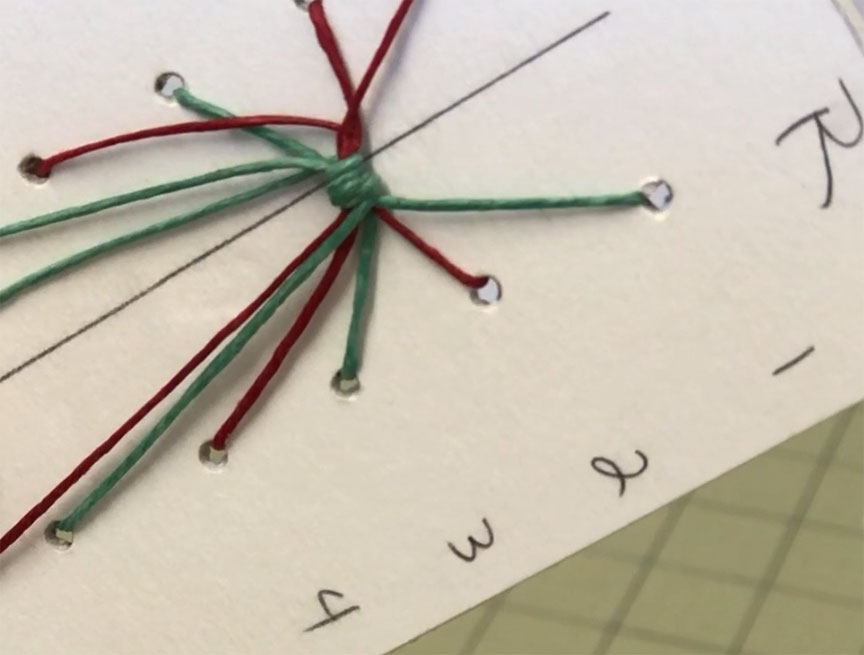
Once your board is prepared bring your thread up through the first two holes from the back. I’m using two different colored threads here to make it easier to distinguish what I’m doing in the video. You can also do this for the decorative effect. I’ve just knotted them together in the back.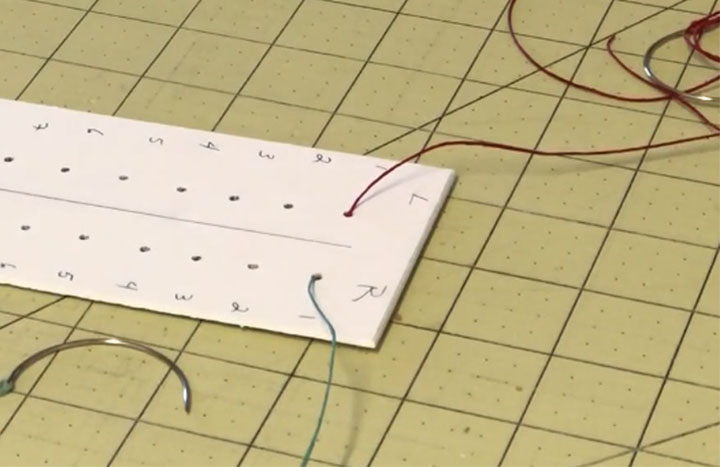
If you downloaded and printed the written instructions you can follow along with those. The first couple of pages are about just creating the ‘head’ of the caterpillar, and this part is where having a diagram or instructions to follow is helpful. Once you get to the body of the caterpillar it’s quite easy to grasp the process once you do one section, and you can finish the rest of your caterpillar without help.
Start with the Head of the Caterpillar
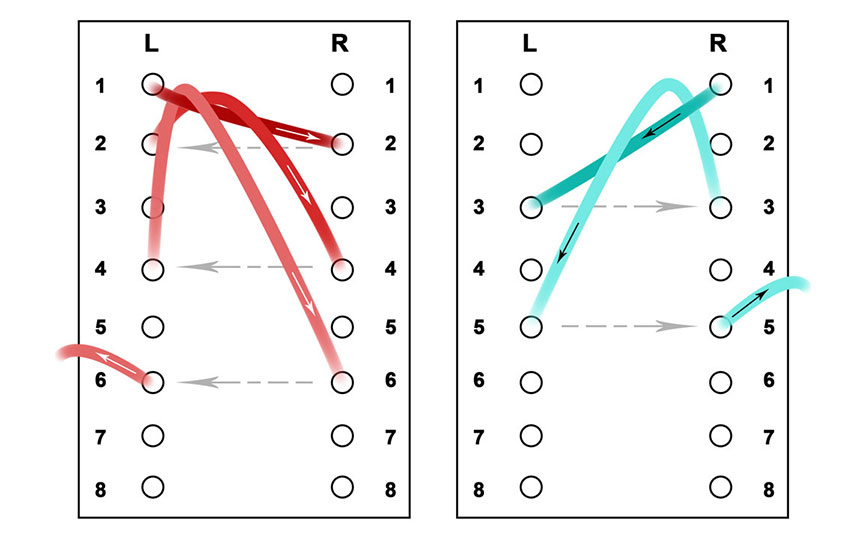
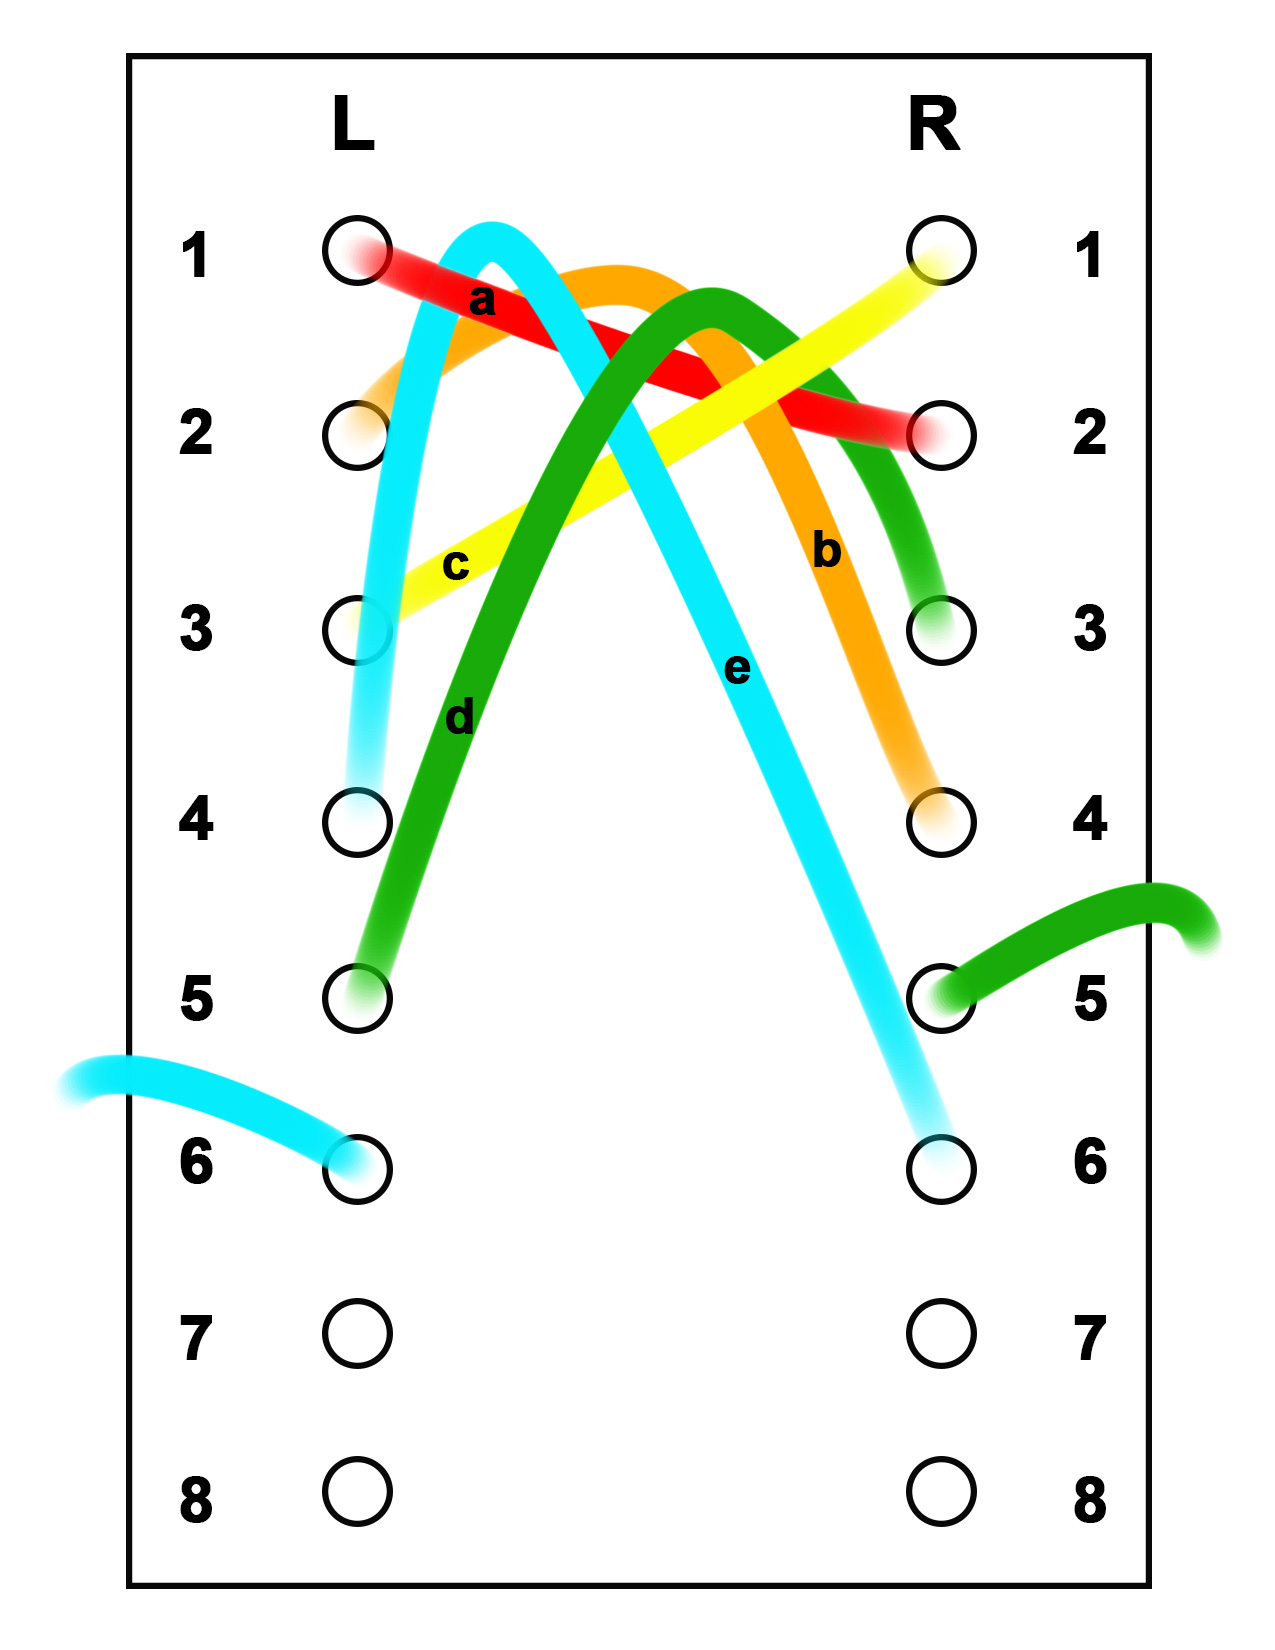 To begin, bring the thread (red a) coming out of L1 down through hole R2. Take that same thread back up through L2 and then bring it (orange b) up, under and over the first thread coming out of L1. Take that thread down into hole R4, skipping R3, and bring it back up through L4.
 Check the back of the sewing constantly. Every thread on the back should go straight across to its corresponding hole, creating a ladder effect with the threads. If you don’t see this then stop and step backwards until you find your mistake.
Now move to the thread coming out of R1 (yellow c) and take it over the other threads and down through L3 and then back up through R3. Take the same thread (green d) up, under and over the threads coming out of R1 and R2 and then down into L5. Bring that same thread up through R5.
Lastly, bring the thread coming out of L4 (blue e) under just the first thread coming from L1, over all the threads and then into R6. Bring this thread back up through L6.
The Hardest Part is Almost Over!
All of this got us through just Page 1 of the instructions. The second page is really just for reference – it shows you what each thread is doing individually. You can’t sew them separately like this, because they need to intertwine with each other, so this is here only if you find the multi-colored diagram confusing.
And, just a reminder – this first part is the most awkward part of the caterpillar stitch. Once you finish the head (and we’re close) the rest is pretty smooth sailing.
So, the last part of this first step is to finish off the head of the caterpillar.
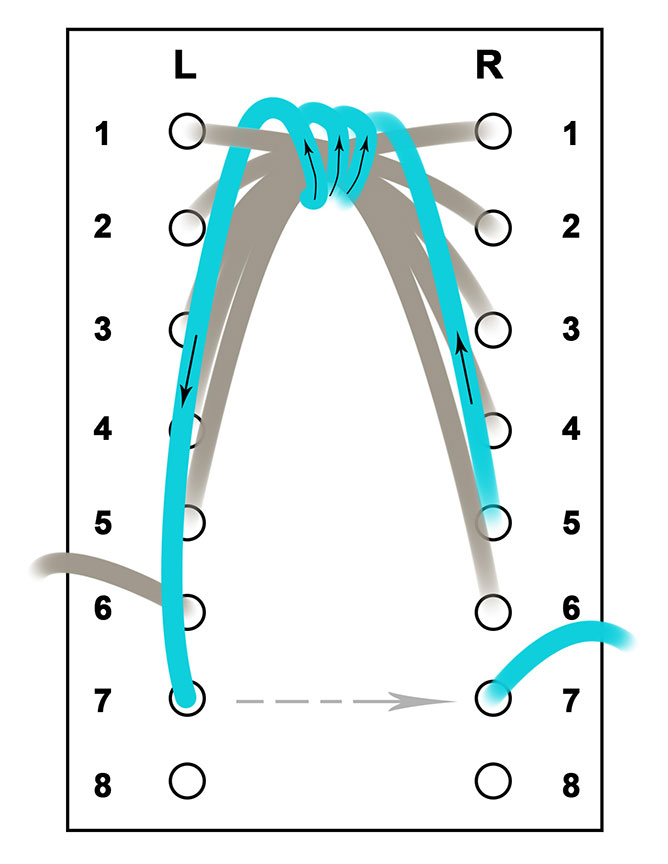 Take the thread coming out of R5 and bring it up and over all of the threads, bringing it out through the center of those threads. Continue wrapping this same group of threads 3, 4 or 5 times, until you get a substantial ‘knob’ of thread that will become the head of the caterpillar. This is called ‘packing’ and this is the only time while you are sewing the caterpillar that the packing will run perpendicular to the caterpillar in this manner.
On the last time around the group of threads, instead of bringing the needle out through the center of the group, just bring it under the first thread coming out of L1. Take the thread out through L7 and then bring it back up through R7.
 Now you’re done with the most awkward part of the caterpillar to construct – the head. The next part is learning how to wrap the body segments.
Finish with the Body of the Caterpillar
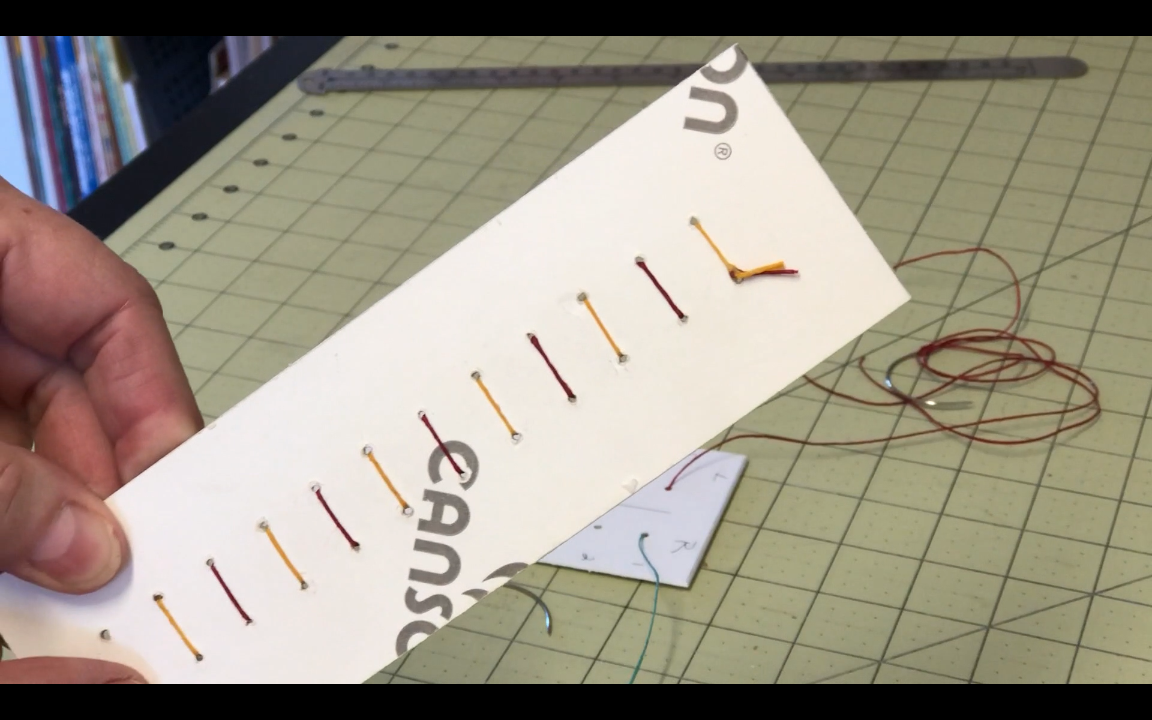
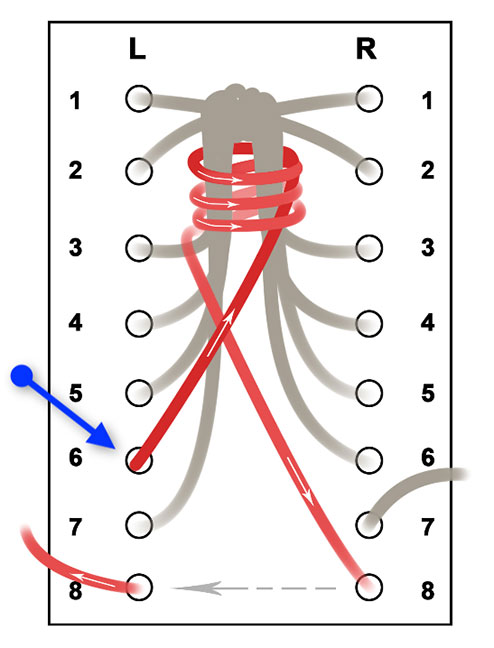 Start with the thread coming out of L6. Take it to the right, across the top of the threads, and then under all threads between holes 2 and 3, taking your needle from right to left. Continue this process – wrapping, or packing, this same segment, until you have it as solid as you want. On the final winding bring the thread out and down to the R8 hole then back up through L8.
This is the basic pattern that you’ll use for wrapping all of the body segments. Whatever side the thread is coming out of you will always start wrapping the segment from the opposite side. You will go back out into a hole on the opposite side as well, coming back up through the hole directly across from it. So, coming from the right you will start wrapping from the left and end that segment by going out through the next hole on the left, and back up through the hole on the right. You’re always wrapping the body segment between the next set of holes.
How many times you wrap a body segment is up to you, and they don’t all have to be the same. You will often have a combination of long and short body segments, so the wrapping may vary.
Adding Thread
This stitch uses up tons of thread, so you will be attaching new thread often. I try to do it in a way so I can hide the knots, either on the underside of the body segments or on the backside of the board. The knot I like to use is shown in my video that you can find here. It creates a nice tight knot that you can position wherever you want.
Continue wrapping the caterpillar body segments until you run out of holes.
Finish Off the Caterpillar
Now you need to decide how you want to finish it off. If you stop once you run out of holes you will end up with lots of long legs left behind, which is just fine if that’s the look you want.
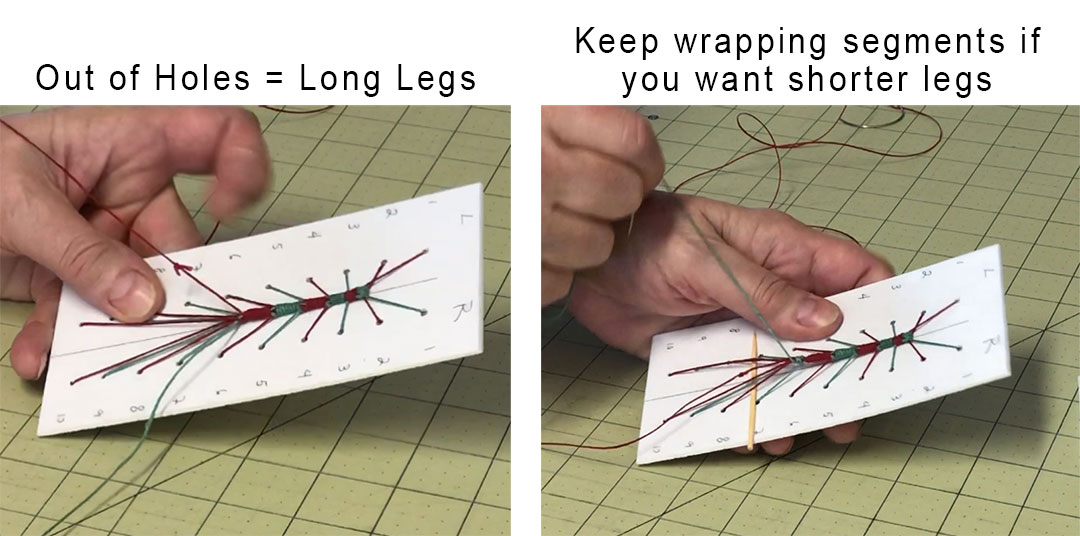 If you want shorter legs at the end then you will want to wrap a few more body segments. You won’t have holes to sew back through – so just let the thread that you aren’t using at the moment run down the center of the caterpillar and wrap it up as you are wrapping a segment with the other thread.
By the way, if you get confused about what two holes you’re packing in between, you can use a toothpick to act as a visual and physical separator, as you see me doing here. This is particularly useful on curves and when holes are close together, where it can get a little confusing.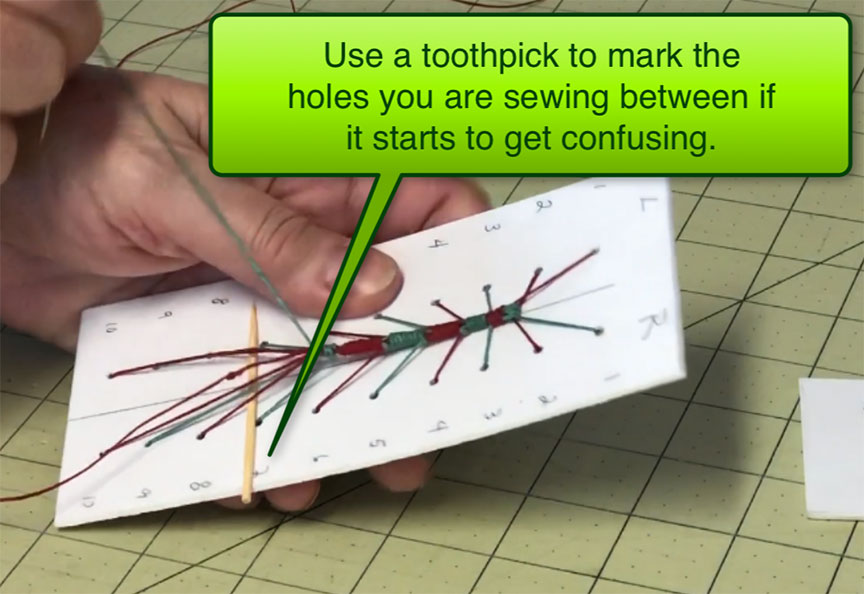
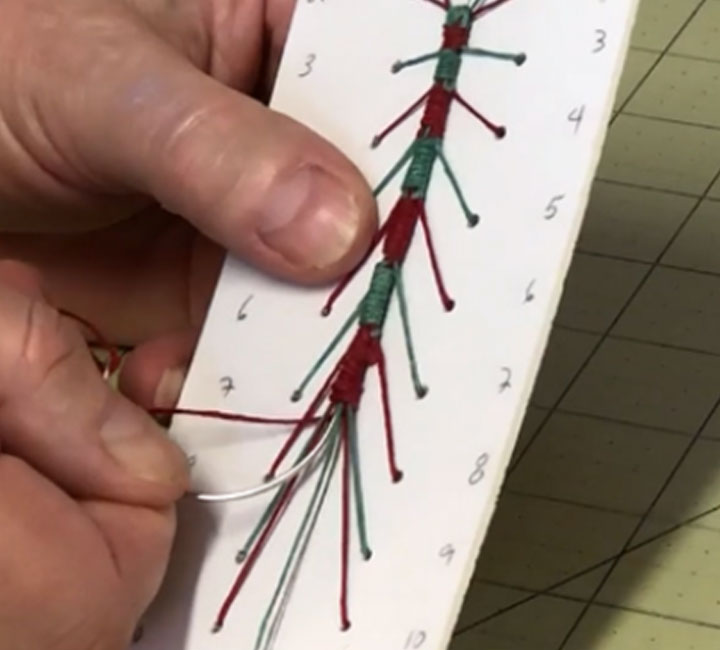 Once you are done packing the caterpillar segments, run the needles, one at a time, up through the center of the caterpillar body through all or part of one or two segments and then trim your thread. One word of advice – as you are packing the last couple of segments, wrap them a bit looser so it’s easier to run the needle up between the packing.
Use this Stitch on a Real Object
That’s the caterpillar stitch at its simplest and you’d use it like this if you were just decorating the cover of a book or a box.
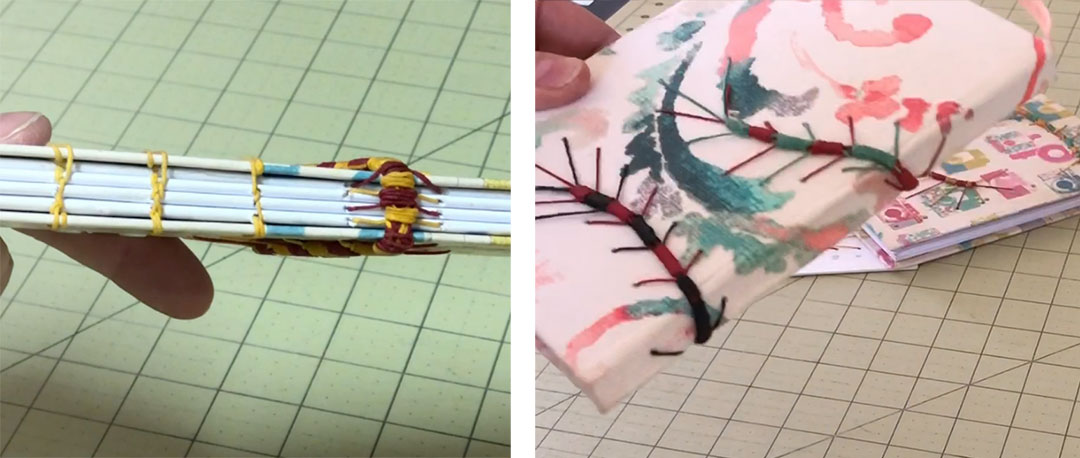
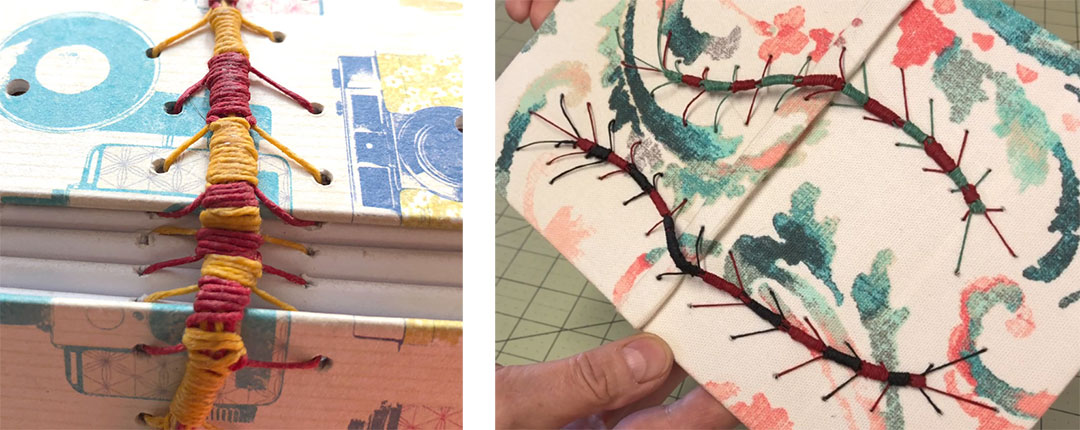 There’s a little more to it if you want to wrap the caterpillar around the front and back of a case-bound book, like the example on the right. And there’s even more to it if you want to incorporate it into the textblock itself, making it part of the binding, like the example on the left.
You can see those details in Part 2 of the Caterpillar Stitch.

