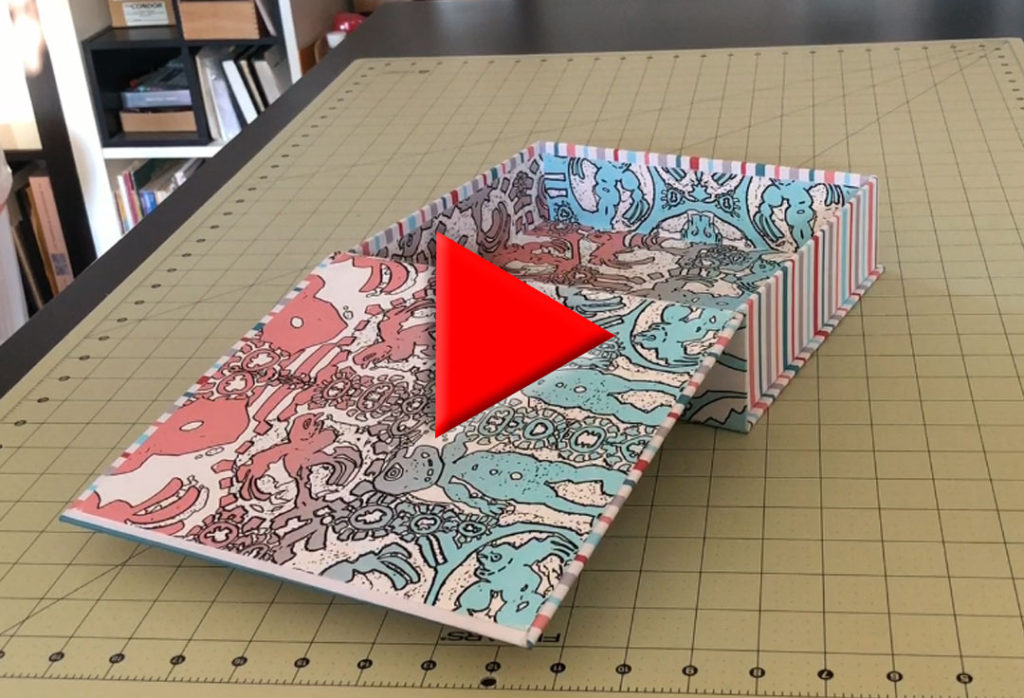
Hinged Lid Box
Click to Watch the Hinged Lid Box Video Tutorial
This tutorial will show you how to create your basic, traditional hinged lid box, good for holding anything and everything. This particular version is covered inside and out with paper, but the hinge is bookcloth, which creates a very strong, flexible and durable hinge.
This is a very sturdy box and the cloth hinge will last for hundreds and hundreds of openings and closings.
Start with the right measurements
Like all boxes and casings, it is important to start with accurate measurements so all of the pieces fit together correctly. I have created worksheets that you can download to make it easy to ensure that all of your measurements are perfect.
You’ll find the worksheets for the Hinged Lid Box here.
Gather and cut your materials
Here’s a quick look at the various materials you’ll want to prepare before you get started. You’ll need bookboard, bookcloth and paper for this box.
Make your own bookcloth
In this example the bookcloth and the paper look the same but they aren’t. The design has been printed on both fabric and paper so I can use it in the appropriate way for this project. If you want to use your own fabric for the bookcloth hinge, here are links to my video tutorials on designing and making your own bookcloth:
Design and Print Your Own Bookcloth
Start the construction with the tray
Start the construction of the box with the tray pieces – pieces 1, 2 and 3.
In addition to the bookboard you’ll want some waxed paper and PVA glue. For making boxes I use a thicker version of PVA glue that I buy from Hollander’s. The thick version sets up a little faster and cuts down on how long I have to hold parts together. You can use regular PVA glue, you just have to be a bit more patient holding the box pieces together.
Buy or make Thick Glue
You can also try making your own thick glue by adding 10 to 15 percent cornstarch to regular PVA glue. This won’t make it quite as thick as the commercial thick glue. But, it does give it more body, which will allow you to create the beads of glue that you’ll want as you construct the box.
You’ll also need a few scraps of bookboard for the gluing process.
Create a backstop to push against
And last, it’s worth taking the time to create a simple backstop that you can push against while you are constructing the box. I use a scrap of wood from another project that I clamp to the edge of my worktable.
I anchor some waxed paper underneath the wood because I will be gluing on this and it helps to keep glue off of my work surface. This isn’t entirely necessary – you could just wipe the glue off of your work surface as you work.
Creating this little backstop is also not absolutely necessary for creating this box. It just makes the job a little easier if you have something to push against while you’re gluing the joints.
Start with the tray bottom
Begin construction of the tray by dabbing thick glue along the edge of the tray bottom using a piece of scrap bookboard. You want a nice bead of glue along the edge.
Make use of that backstop
Place one of the sides against the backstop you created. Be sure you have the correct one – remember you have two different lengths for the sides. Make sure the pieces are lined up and firmly press the tray bottom up against the side piece. The side pieces will all go on the outside of the tray bottom. This creates a much stronger box than if you put those sides on top of the tray bottom.
Clean up the excess glue
Hold the two pieces tightly together for a few seconds and then use another piece of scrap bookboard to clean out any excess glue along the seam.
Pull the joined pieces up off of the waxed paper and wipe any excess glue off of the back of the joint. You don’t have to wipe away all evidence of glue, just make sure there are no lumps or globs.
Repeat the process on the other side
Add glue to the opposing edge of the tray bottom and repeat the process that you used on the first side, cleaning any glue from the inside of the joint and wiping glue from the back of the tray bottom.
Now the last two sides
The next step is to put the other two sides of the tray on. This time you’ll apply glue to the two short edges of the other sides as well as the long edge of the tray bottom. Be sure to clean any excess glue off of your work surface before continuing.
Dab glue along those three edges, just as you did with the other edges. Place the new side panel against the backstop and align the tray with that piece. Press firmly and make sure that the previously glued side panels are lining up perfectly with the edges of the new side panel.
Hold it…
Press and hold all of this in place for a few seconds and then clean up the seams just as you did before. Peel the tray off of the waxed paper and clean the glue off of the back as well.
Follow this same procedure to glue the last side onto the tray bottom.
Let the tray dry completely
Make sure all of the joints are firmly secure and all excess glue has been cleaned off, and set the tray aside to dry. You want this to dry completely, preferably over night, before you start covering it.
Start work on the lid
While you’re letting the tray dry you can start working on the lids and hinge. For this part you’ll want the remaining bookboard – pieces 4 and 5, both pieces of bookcloth – pieces 14 and 15, the two outside lid papers – pieces 6, and the inside lid paper – piece 13.
There is technically only one lid on this box, but you will be constructing a symmetrical piece that wraps around the entire box, so for ease of description I am just going to refer to these as the lids, plural.The spine paper – piece #7, is optional. You’ll see how that piece is used in a few minutes.
Gather your materials and make a spacer
You’ll also want regular PVA glue and a glue brush, and some scrap paper to glue on. Additionally, you might want to make a spacer to make it easy to measure the gap between the main bookboard and the spine piece. This isn’t necessary or required, but if you plan to make several books, taking the time to make these spacers will save you time later.
I just glue scraps of bookboard together until I have the thickness I want. I’ve created several of these in varying thicknesses that I can use for all of my book projects. You’ll want a 3/16th inch spacer for this project.
Start with the spine
Start with the spine piece of bookboard – number 5 – and the outer spine piece of bookcloth – number 14. Before I apply glue to this piece I like to draw guidelines so I know exactly where to place it once it’s covered with glue.
Apply PVA glue to the piece of bookboard and press it down on the bookcloth, placing it within the guidelines you’ve drawn.
Place this on a clean piece of scrap paper and apply glue to one of the long edges.
Add one of the lids
Remove the spine from the scrap paper and place the spacer, if you have one, along the edge of the bookboard. If you don’t have a spacer you can eyeball or measure the 3/16th inch gap that you’ll need to leave.
Take one of the bookboard lids, placing it next to the spacer and aligning it top and bottom with the spine piece. Try to do this quickly and remove the spacer before it permanently adheres to the bookcloth.
Add the second lid
Place all of this back on the piece of scrap paper and repeat this process for the other bookboard lid – applying glue to the edge of the bookcloth, placing the spacer and adhering the lid to the bookcloth. Place this under weight for a few minutes to make sure everything is firmly glued down.
Glue the flaps
Next you’ll want to glue down the flaps top and bottom. Apply glue to the flap and fold it over, pressing it down firmly. Use your bone folder to force the bookcloth into the gaps, adhering it to the bookcloth on the other side. Move the lid up and down to facilitate the connection. Burnish this flap down front and back with your bone folder, using a barrier paper to protect the surface of the bookcloth.
Follow the same procedure for the second flap and then place this under weights.
Check the fit
Before finishing off the lid make sure your two parts fit together correctly. When the tray sits on the bottom lid, with one of the sides flush against the spine, there should be about ¼ inch extra on the other three sides. It should fit the same way both top and bottom, on all sides.
Finish off the inside of the lids
Once you’ve determined that everything is going to fit together correctly you can finish off the inside of the lids. Start with the other piece of bookcloth. This piece should fit with about ¼ inch margins on the top and bottom.
Place this piece upside-down on a piece of scrap paper and cover the entire piece with regular PVA glue. If your bookcloth has an obvious direction to it make sure it is oriented correctly. Center it over the spine, top to bottom and side to side, and press it down lightly.
Fill the gaps
Cover the bookcloth with a piece of scrap paper and then firmly press the bookcloth down into the gaps with your bone folder. You want the new bookcloth to adhere to the bookcloth on the other side in those gaps. This will create strong hinges.
Once you’re sure the bookcloth has been pressed into both gaps then you can finish pressing down the bookcloth covering the rest of the spine. I usually put some weight on this briefly while I’m gathering the pieces for the next step.
Decide on the optional spine piece
The next pieces that you’ll glue are the outer paper pieces – #6, and the optional spine piece – #7. This optional piece would go on the outside of the spine, covering most of the bookcloth. It gives some continuity to the overall covering of the box, but I prefer the decorative nature of a contrasting pattern along the spine, so I leave that off. Use it or don’t, as you see fit.
Glue the outer paper pieces
The cover paper should be placed about ¼ inch away from the spine edge. If your measurements are correct this will leave about 1 inch extra on the other three sides.
Place the first piece wrong side up on a piece of scrap paper and apply PVA glue. Carefully line this up ¼ of an inch from the spine edge, keeping about 1 inch excess margin on the top and bottom. Lay the lids out flat and firmly press this paper down, making sure it is completely adhered. Pay particular attention to the edge near the spine making sure that it is completely glued down.
Add some temporary weight
Weight this side down temporarily and follow the same procedure for the second side. Put the second side under weight for a little bit to ensure that the paper is firmly glued down.
Trim the corners
The next step is to trim the corners of the cover paper so you can turn those edges. The corners need to be trimmed at a 45 degree angle leaving about a quarter of an inch of extra paper at the corners to be sure the bookboard is covered at the corners.
Create a template for this task
I do this task so often that I’ve made a simple template out of scrap pieces of bookboard that I can cut against.
Pre-fold thick paper
After I’ve cut off the corners I bend the paper around the bookboard to pre-fold it a little before I apply the glue. You don’t need to do this if the paper you’re using is fairly thin. The paper I’m using is thick so pre-folding it helps once it’s time to glue it down.
Glue the margins
Place the lids upside-down on a piece of scrap paper. Apply glue to one of the margins and fold it over. Pinch the corner, pushing the excess paper in a bit, creating a miter at the corner. Carefully push all of this down with a bone folder.
Do the same to the next two sides
Follow the same process on the opposing side, pinching in the excess at the corner.
Glue the third side in a similar manner. This side is easier because the corners have already been pinched, so you just need to apply glue and fold it over, pressing it down firmly.
Add the liner paper to the lid
The next step is to glue in the lid paper liner. You should only have one of these and it goes on the side that will become the actual lid, so make sure you have everything aligned correctly, in case any part of the paper or bookcloth has a directional design, as my example here does. This is piece #13, if you’re using my worksheets.
Place this piece wrong side up on a piece of scrap paper and cover it completely with glue. I always give the edges one last swipe before I put this piece in place because I want to make sure all of those edges are completely and firmly glued down.
Place the liner paper
Carefully place this paper on the inside of the lid, making sure the pattern orientation is correct, if the paper on the box has a pattern. When placing this liner you should have about a quarter of an inch margin around all of the edges, including the hinge.
Press this down firmly. Cover it with a piece of barrier paper and use your bone folder to make sure it is adhering everywhere, particularly along the edges. Place all of this under weight and allow it to dry thoroughly.
Don’t worry if the bookboard warps a little
By the way, once this is dry you might notice that the side that has paper glued to both sides is nice and straight and that the bookboard is warping slightly on the side that has paper glued to only one side. This is normal. Bookboard will warp a bit when glue is applied to only one side, but it equalizes and straightens out once glue is applied to the other side.
Next, cover the tray
You’re finished with the lid portion of the box for now. The next step is covering the tray. You’ll use the paper pieces numbers 8 and 9.
Start with a long side
Start with one of the pieces for a long side – piece #8. Place it wrong side up on a piece of scrap paper and apply glue. Center the long tray side on this piece and press it down firmly. If it helps, you can draw guidelines before applying the glue, but I find it pretty easy with this piece to just eyeball the placement.
Glue down the short margins
Next, you’ll want to fold up the short sides. The glue may have dried a bit on these edges as you were pressing down the main part, so refresh the glue on these side tabs if necessary.
Fold those up and make sure they’re firmly glued down. Then, gently pinch the paper together at both bottom corners.
Trim the corners of the paper
You’re going to trim the corner to make folding the paper and covering the corner easier, and pinching the corner will give you a guide for trimming it.
You don’t want to cut right down to the bookboard, but about a quarter of an inch away from the corner. This will leave enough paper to cover the corner when you fold it over.
Apply some glue
Trim the other corner the same way. Lay the tray on a piece of scrap paper and apply glue to the long margin, as well as the small tabs left on the short sides when you trimmed the paper.
First fold down the small tabs on each side and then fold down the long margin, pressing everything down firmly and evenly. Use your bone folder to smooth everything down.
Next, make a cut on the inner corners of the paper. Don’t cut all the way to the bookboard but stop about 1/8th of an inch before. And, don’t cut the slit right at the corner. Cut it a little ways in from the corner – maybe 1/16th of an inch. This little bit of extra paper helps cover the corner of the bookboard.
Glue the small tabs first
Glue down the small tabs first. Use your bone folder to gently push the excess paper into the corner of the tray. Be careful while doing this. The paper will be damp from the glue so it will be a bit fragile and it’s possible to tear or damage it. Because you didn’t cut this right at the corner there should be a little bit of paper to sides cover the corner seam.
Once you’ve firmly glued down both small tabs, apply glue to the long margin. Fold this over and firmly press it down. Once again, carefully use your bone folder to smooth everything down.
Follow this same procedure on the opposite side.
Applying the paper to the outside of the other two sides is much more straightforward because you’ve already taken care of the corner seams with the first two sides. For these sides you will simply fold over the top and fold over the bottom.
Place one of these side pieces – #9 if you’re using the worksheets – wrong side up on a scrap paper and apply glue, making sure you cover all of the edges. Center this piece on the side of the tray, both top to bottom and side to side. I realize this is off-screen in my video, but you’re just centering this piece.
Press it down firmly and fold over both of the margins, top and bottom. If you do this fairly quickly you can probably get the whole piece glued down without adding extra glue. Use your bone folder to gently smooth down all the edges.
Follow this same procedure on the last side.
Now you need to cover the inside of the tray. If your inside paper is thick, which mine is, you might want to pre-fold it before applying glue. This will make it easier to put it in place. If your paper isn’t particularly thick and is reasonably flexible this step won’t be necessary.
I use my bone folder to score the folds so they will be easier to fold. I might even trim the corners a little where they overlap just to reduce the bulk. By the way, these are the short side inside papers – #11 on the worksheets.
I also do this with the corner crease on the long side inside papers.
Once you have all your paper pre-folded you can start gluing these pieces in place. Start with the short sides. Apply a thorough layer of glue, making sure to get all of the folded edges. Put this in place inside the tray and gently but firmly make sure all of the folds and margins are attaching to the tray. Use your bone folder to push those areas into place.
Remember that your paper is more fragile when it’s damp from the glue so be careful while you are doing this. If you want to put a lot of pressure on it with your bone folder then use a piece of barrier paper to protect it. I usually do this in two steps, pushing it down initially with my fingers and lightly with the bone folder, and then using a barrier paper so I can apply more force. Make sure all of the flaps are firmly glued down.
Next apply glue to the long side papers – these are number 10 on the worksheets. These pieces are easier to place because you’ve already taken care of covering the side corners, so you only need to worry about that long bottom seam, which is easy, particularly if you’ve pre-folded your paper. Use the same care when pressing these down with your bone folder that you used on the previous sides.
The last step for the tray is the paper that goes on the inside bottom of the tray. This is piece number 12 on the worksheets.
Apply glue to the entire piece, being sure to get good coverage at all of the edges. Carefully center it inside the tray and press it down firmly, being sure that all of the edges are glued down.
The final step is to glue the tray and the lids together. Use thick PVA glue to do this, if you have it. You can use regular PVA glue, if that’s all you have, you’ll just need to be a bit more careful about how you apply it so you get enough glue put down to hold everything together, but not so much that it squishes out the sides.
Actually, you want to be careful of that regardless of what kind of glue you use. You’ll also want a couple of pieces of scrap bookboard for applying the glue.
Carefully line up the tray and the lids. With one long edge of the tray butted up to the spine on the lids, make sure that you have equal margins on the other three sides, both on the top and bottom of the box.
You’ll glue the spine first, so weight down the tray on the bottom portion of the lid once you have it lined up correctly to keep it from moving. Double-check that everything is still where you want it before proceeding with gluing the spine.
Use a scrap of bookboard and dab glue along the spine, keeping it about ½ inch away from the edges. You need to allow for the glue to move a bit, and you don’t want much to squeeze out.
Once you have the glue applied, fold the spine up and hold it in place. Clean up any glue that is squeezing out.
Give the glue a minute or two to firmly adhere. Remove the weights you placed inside and set the box on its spine. Replace the weights, applying them to the spine.
Once the spine has had a chance to dry, the final step is to glue the back of the tray to the bottom lid. Use thick PVA glue for this, if you have it, and a piece of scrap bookboard. A fairly wide piece of bookboard will make the job go a little faster.
Spread glue around all of the edges of the bottom lid, but don’t spread it right up to the edge. Remember that there is a ¼ inch lip all the way around that you want to avoid. Plus, you don’t want it to squeeze out, so apply the glue accordingly. On the spine side you can apply the glue right up to the spine piece.
Once you have glue all around the edges make several more lines of glue across the center of the board.
Fold the tray down onto the bottom lid and press it down firmly. Fill the tray with weights. You can use heavy books or fabric-wrapped bricks for this, although soft weights are easier to squeeze into place. Close the lid and place heavy weights on top of the box. The way this box is constructed, assuming you used good bookboard and not chipboard, you can put a lot of weight on it without worrying about it being crushed.
And there you have it – a hinged lid box good for keeping all sorts of treasures in.