Card Box / Portfolio Box
Click to Watch the ‘Card Box’ Video Tutorial
You’ll find the worksheets for the Card Box here.
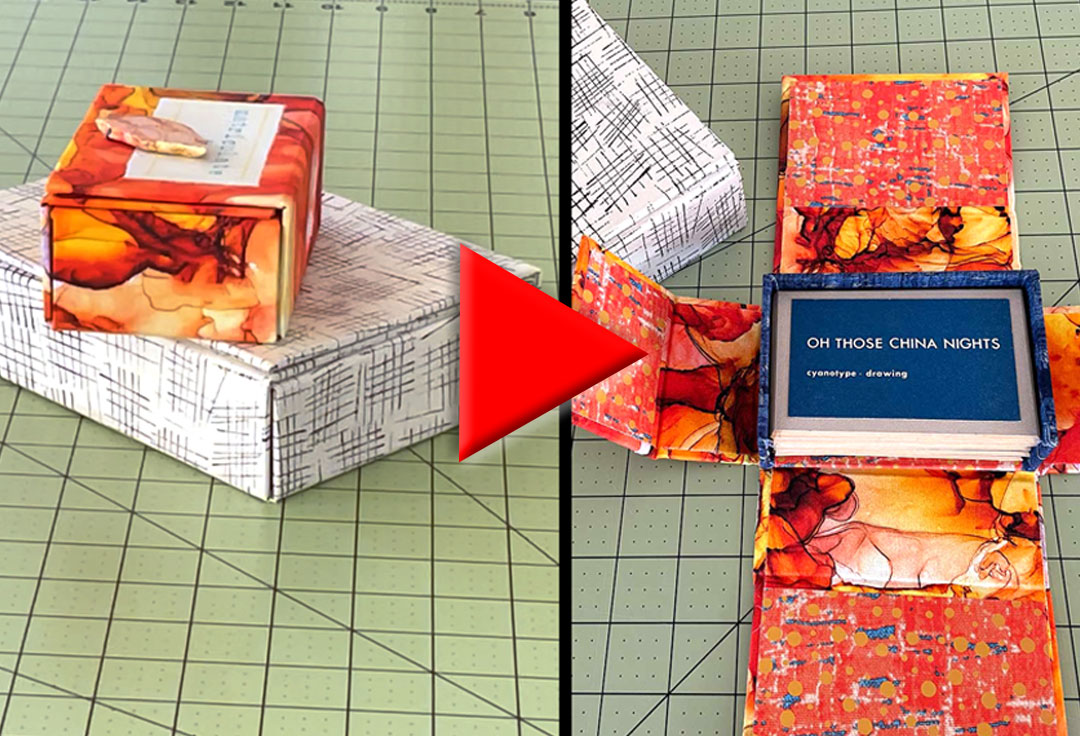
Card Box/ Portfolio Box
This neat little box is a favorite of mine. It’s versatile and can be used for all sorts of things – a stack of photographs, old postcards, prints… whatever you want. It makes a great portfolio for your artwork. It’s very substantial feeling, and satisfying to open and close.
I initially saw this box as a stand-alone, without the internal tray. It will certainly work like that, even if the contents of the box don’t fill it all the way up, but I prefer it with the tray, which tends to give it more structure and also just makes it feel more substantial.
I also like to leave the tray loose, but that’s not necessary. If you want to glue it permanently to the base then you could eliminate some of the paper that you glue down, both to the base and also to the bottom of the tray. Just adjust your paper measurements accordingly.
You can also add any sort of image to the top of the box, or a decoration or closure. You can add the image at any time, but if you want to add a physical decoration or closure, consider what you want it to look like on the inside of the lid. If you don’t want the attachment to show then you’ll want to do that before you add the liner paper.
You’ll want to start this project by filling out the worksheets, which are available on my website. Go to handmadebooksandjournals.com > Make Custom Books > Boxes and Slipcases > Card Box/ Portfolio Box > Card Box/ Portfolio Box Worksheets. This will take you to a page where you’ll see all of the worksheets in both Imperial measurements and Metric measurements. There are six worksheets for the project – four for the box itself and two for the tray, which is optional.
Click on the worksheet you want to download and it will take you to a new page. How you actually download it will depend on the browser you’re using. In this example I’m using Safari, so I Control-click and get some options. I could just choose to “Save Image to Downloads” or I can “Save Image As…” if I want to save it somewhere else.
When you are filling out the worksheets, start with the contents of the box because you will need to increase the overall dimensions to take into account the tray and the box itself.
Once you’ve filled out the worksheets, the first thing you want to deal with is the size necessary for the bookcloth. It takes a pretty big piece of bookcloth to accommodate the structure that you’re going to make. If you’re using purchased bookcloth you’ll want to buy something large enough. I’m sure it’s possible to find a creative way to cobble together smaller pieces of bookcloth, but that will take some creative thinking to get seams and edges to line up the way you want.
If you are making your own bookcloth, and I do have a couple of videos on that subject that you can view here, then the challenge might be finding a surface large enough to create a piece the size you need. I use my cutting mat and weight down the sides, because it will want to curl up as the bookcloth dries. I could just use my worktable but I like to be able to just cut the dry bookcloth off of the surface, and the cutting mat allows me to do that without damaging my table.
Initially you will cut large amounts of bookcloth away from the corners to fit the structure you are covering, but you will use these pieces later on for the inside, so don’t get rid of them, and don’t worry about them being wasted.
Next you’ll want to cut and mark all of the bookboard pieces. I always mark these with the number of the piece so I don’t get lost when I’m gluing it all together.
Then you’ll want to cut your bookcloth to size – just the overall, general size. Don’t worry about the corner pieces yet.
Before I cut this rather precious piece of bookcloth I always mark off the general size with a pencil and arrange all of my bookboard, with more-or-less the right spacing, just to make sure that my measurements are right. Take note of the fact that there will be a 1” border of bookcloth around all of the edges of the bookboard that will eventually be wrapped around the edges of the board. Doing all of this pre-measurement saves all the crying if you cut it and then realize that your math was wrong.
Once I know the bookcloth is adequate and I’ve allowed for the 1” margin, I can begin gluing the bookboard down.
I’m going to start by gluing this lower middle board, but first I need to figure out its placement. I need to know how far to the left from the border it needs to be placed. So, I’m going to line up board #1 and board #4 temporarily, starting at the border and spacing them apart precisely using spacers. I’ve weighed these down so they don’t shift as I glue the first board, board #5, into place. I’m using regular PVA glue for all of this.
Glue the next piece in place, board #6, using the same process of using spacers to keep thing correctly aligned.
By the way, these spacers that I’m using are ones that I designed and then 3D printed. I am selling these in my Etsy store and you’ll find the link to that in the description below the video, if you’re interested. However, you don’t have to use anything fancy like this. You can make your own spacers just by gluing bookboard together until you get the thickness you want, or just draw out the measurements and bookboard placement on the back of your bookcloth. I like using spacers just because it seems more efficient.
Continue this process of marching up through the center of the project, gluing the next pieces in order, and using the temporary placement of the boards on the right side to ensure alignment. I weight each piece as I go just to make sure they are fully glued down.
Once you have the center pieces glued in place, start gluing the right and left pieces. It doesn’t matter what direction you go first. Continue to use spacers and the alignment of the center pieces to keep everything in place, or just follow the guides drawn on your bookcloth, if that’s the method you chose.
Finish off both sides in this manner, weighing pieces down as you go. Once I have everything glued down I put a heavy weight on the whole contraption and let it dry for a little while. This isn’t probably very necessary, but it gives me a chance to clean up and prepare for the next step.
And the next step is to cut away the corners of the bookcloth. Remember to hang on to these corners as you will be using them later to line the inside of the box.
Mark the 1” margins around each side of the glued bookboard and cut these corners away.
Once you have the basic shape cut out, your next job is to trim the corners all the way around to remove some of the bulk when you start gluing those edges down. Again, I have a 3D printed corner cutter that makes quick work of this job, but you can make your own out of bookboard – I have a video here showing how, or just wing it and chop off those corners.
You’ll want to save those little corners for later, so be careful about how randomly you hack them off, and make sure that you don’t cut right up to the corner of the bookboard.
You’ll also want to cut the four inner corners. Cut these almost up to the bookboard, but not quite.
Now you can start gluing those edges down. I use regular PVA glue for this. I like to pre-fold the margins a little just to make it a bit easier to fold them over when they’re covered with glue.
I’m going to start gluing with the two outside edges and glue the end piece last. I’m applying glue as I’m holding the piece, but you don’t have to do it this way.
Just place it on a piece of scrap paper and apply the glue, if that’s the way you prefer.
Keep a wet paper towel handy to wipe off any excess glue from your fingers and then fold that margin over onto the bookboard, using the ball of your hand to push it firmly over the edge. Take extra care with the corner, pushing the excess bookcloth down to cover the corner of the bookboard. It should look more-or-less like this.
Use your bone folder to smooth down the bookcloth and push out any air or wrinkles, and be sure to push the bookcloth into the gaps to ensure that it is attached there. Pay close attention to the inside corner, and push the bookcloth into that area and over the corner of the bookboard as much as you can.
Do this same process to the opposite side.
The short side of this piece of the box is the easiest because you’ve already taken care of the corners. So, just apply glue to this side and fold it over, using your bone folder to smooth it down. Your outer corners should look something like this.
Use this same three step process to do all four sides of the box.
Take a moment here and fold all of the sides together to make sure your measurements were right and everything fits correctly. No point in moving on if there’s a mistake here.
The outside corners will now be done, completely encased in bookcloth, but the inner corners still need a little attention. This is where you will use some of those bookcloth corners that you cut off when trimming the outer corners.
The goal here is to cover the bookboard corner that has been left exposed by the first bookcloth that you applied. It doesn’t have to be particularly pretty, as most of it will be covered up with the inner liners, it just needs to cover the bookboard.
Place the little corner piece upside down on a piece of scrap paper and apply regular PVA glue. Loosely line up the long edge of the corner piece with the long span of the bookcloth that is glued down to the inside of the corner. Hold those two edges together while you use the bone folder to force the little piece down into the gutters to adhere to the other bookcloth.
Once you have all four inner corners covered, your next step will be to line the inside hinged areas with the bookcloth that you cut from the corners of the large piece of bookcloth.
In general, these pieces will be centered across the two hinged gaps with about an inch of overlap on each side, and they will have about a 1/4 inch margin from side to side.
Place the piece of bookcloth liner wrong side up on a piece of scrap paper and apply regular PVA glue. I generally just eyeball the placement, trying to get it as square as possible and making sure the margins from side to side are fairly even.
Press the end portion down first and then work the bookcloth into the hinge gap with your bone folder. Proceed to smooth down the center section and work the bookcloth into the next hinge. Use your bone folder to smooth everything down.
By the way, you may have noticed that the bookboard is slightly curved. This is because you have applied glue to only one side of the bookboard and that moisture has warped the board a bit. Once you finish applying the inside liners the bookboard will flatten back out.
The next thing I’m going to do is apply the paper liner. You don’t have to do it in this order – you can apply all of the inside bookcloth first before applying any of the paper. Just don’t apply the paper parts to any area that hasn’t had the bookcloth applied. The paper covers up the raw edges of the bookcloth.
Remember though, that if you want to add some kind of attachment or clasp and you don’t want it to show on the inside, do it before you add the inner paper liner.
Treat the paper just as you did the bookcloth. Place it face down on a piece of scrap paper, apply regular PVA glue and eyeball the placement, centering it on the flap and giving equal margins on each side. Smooth it down with your bone folder, but don’t be too aggressive. The paper will be a little damp and that makes it easy to damage. If you’re concerned about damaging the surface of the paper, place a barrier paper on top before you smooth it down with the bone folder.
Once I completely finish a flap I like to weight it down to dry while I am working on the other flaps.
Finish all four sides in this manner.
And, finally, to finish off the main structure of this box, apply the inside paper liner to the center of the bottom of the box. if you are going to make the tray, and you plan to glue it down, then you can skip this step because the tray will cover up that entire area.
Once all of the inside liners are glued in place, weight down the whole thing and let it dry. If all you are making is this outer box then you’re finished. The rest of the video will describe the construction of the inner tray.
Making the tray
The tray is fairly simple to construct. It has three sides plus the base. You’ll cut one long piece of bookcloth to wrap the edges and one piece of paper that wraps around the inside and the outside of the base. There are small margins between the edges of the paper and bookcloth.
To glue the tray parts together I like to have a backstop that I can push against. I use an old wrapped board from another project, but any board will do. You could even wrap it with shelf lining paper or some other slick material to make it easy to clean any excess glue off. I clamp this down to the edge of my worktable to create a strong edge to work against.
To construct the tray you’ll want a thicker PVA glue than just the regular PVA. You can buy a thick glue from Hollander’s or from Talas. You can even make your own by mixing 15% cornstarch with regular PVA glue. It’s not quite as good as the purchased version but it will work. In a real pinch you can use just regular PVA, but you’ll find it a bit frustrating as you’ll have to hold the pieces together much longer than you’ll want to in order to get them to set.
You’ll also want a couple of scraps of bookboard for the next step of gluing the pieces together. I always save my old scraps for this task.
Start by applying a bead of glue to one of the short edges of the base of the tray, piece number 14 if you are using the worksheets. You don’t have to be super careful with this step because you’ll clean up the excess glue in a minute, and you do want a good bead of glue when you are gluing all of these edges together.
Place one of the edge pieces, number 16 on the worksheet, against the backstop, and carefully align the glued edge of the base to that piece. Push them together using the backstop to push against. Hold them together for several seconds and, while you are holding them together, use another scrap of bookboard to clean out the excess glue on the inside seam.
Then carefully peel the combination off of the work surface. You don’t want to leave it there very long as the base will want to glue itself down to the work surface. Smooth down any excess glue on the back. This doesn’t have to look pretty since it will all be covered up, but you don’t want any dried clumps of glue, inside or out. Clean any glue off of your work surface before doing the other side.
Follow the same process for the other side – creating a bead of glue along the edge, pressing it firmly to the side piece, and pulling it up after a few seconds of holding it tightly against the backboard. Be sure to clean up the excess glue from the inside and outside edges. Set this aside while you clean up your workspace.
Next you’ll apply glue to three edges – the base edge and both side edges. Press this against the remaining side piece – piece number 15 on the worksheets. Move the side pieces into place so they line up perfectly with the spine piece and hold them in place briefly to ensure that they’ll stay.
While you are holding them in place, clean the excess glue out of the seams.
€2
Don’t wait too long, though. You don’t want the tray to glue itself permanently to your work surface.
Clean this up just as you did the other sides then turn it upside down so it doesn’t stick to your work surface and let it dry. I like to dry it over night so it’s nice and solid when I go to wrap it with bookcloth. If you try to do that before it’s fully dry, you’ll probably regret it.
So now the construction of the tray is done – your last step is to cover it with something interesting. You’ll do the long strip of bookcloth that wraps around the sides first. This is definitely the most involved part of creating the tray.
But before you start, make sure the tray fits the way you want inside the box. There’s no point in moving forward if that isn’t right.
I start by drawing guidelines on the back of the bookcloth. You don’t need to draw every guideline – just enough to get you started. If your measurements are right then the rest of it should just fall into place.
I draw the margin guides on at least one long side and one short side. There should be 3/4” (19mm) margins all the way around. I also draw the length of one of the sides of the tray (yy on your worksheet) to get the starting line for the spine. The spine is the piece I will glue down first.
Once I have the guidelines drawn I physically measure off the piece of bookcloth using the tray itself. This is a quick check just to make sure everything is set before gluing. You should have enough bookcloth for both end margins, and enough to wrap fully around the outside and inside of the spine with margins left over that will fall onto the inside of the base and the outside of the base. Don’t worry if you don’t have exactly 3/4 of an inch for the margins. You just need enough that the edges will be covered by the liner paper.
Once you’re sure everything fits you can start gluing. So I am starting with the spine that will be placed in the center of the bookcloth. Apply regular PVA glue to the spine of the tray and carefully align it according to the guidelines you have drawn. Make sure your tray is facing the right way. Press this down firmly and hold it in place for a few seconds.
Next apply glue to one of the sides and roll it over into position on the bookcloth, aligning it with your guidelines. Press it down firmly. I am putting a weight on this side, but that’s not entirely necessary. I’m just lazy about holding it in place.
Apply glue to the last side and roll this over onto the bookcloth, continuing to follow the guidelines you’ve drawn. As always, press this down firmly and hold it in place for a few seconds.
The next step is to deal with the margins that fold onto the base of the tray. Start by pinching the corner of the bookcloth to get a sense of where the tray corner is. Then trim the material with a pair of scissors. Don’t trim right up to the bookboard. The goal here is to reduce the bulk of the material that will be folded over, but you still want to ensure that the bookboard is completely covered.
Once you’ve trimmed both corners, place the short side of the piece on a piece of scrap paper and apply glue to the bookcloth. Don’t apply glue all the way to the corner of that margin as you won’t be gluing that part down just yet.
Press the glued bookcloth onto the base of the tray and rub it down with your hand or a bone folder. Squeeze the corner a bit so that it is mitered when folded over.
Treat the other short side the same way.
The third side is easy since both of the mitered corners have been dealt with. Just apply glue as usual and press the bookcloth down. I weight this down briefly while I clean my glue brush.
The next part of this is a bit trickier, and you have to take some care with the cuts you make to the bookcloth. You don’t want to make these cuts perfectly aligned with the edges of the tray, but slant them as indicated so the bookcloth will cover the inside corners. This is what the outer flap edge cuts should look like. As always, don’t start the cuts right against the edge of the bookboard. Start the cut about one bookboard thickness away.
The inner corners are the same way. You don’t want to cut them straight down the corner fold, but slant the cut a little. This will give you some bookcloth to push into the corner to cover the bookboard.
Cut the other corner and the other side flap accordingly.
Before you start gluing anything press all of the bookcloth onto the bookboard, over the edges, and into the corners to pre-fold the pieces. You may find that some of your cuts need to be trimmed a bit to get rid of some bulk. Be conservative as you do this and trim a little at time until the bookcloth fits comfortably in the corners. This will make it easier once everything is covered with glue.
Start gluing the outer edges, and glue the tabs in this order:
Use your bone folder to push the bookcloth into the corner. It’s important that this piece covers the corner seam. Glue the second flap and then the large flap, flap number 3. Use your fingers and a bone folder to force the bookcloth into the seam, and to smooth everything out.
Follow the same process on the opposite side.
Lastly, glue down the spine flap. This one is easy because the two tricky corners have already been dealt with. I will generally weight these down while I clean up my brush and glue pot, but that’s probably not entirely necessary. Just something I do because the weights are right there.
The last step for the tray is the paper liner. I draw a line down the center of this paper but I don’t fold it. If you fold it in half the crease will show up on the edge of the tray. I just use this line as a guide.
I apply glue to only one half of the paper to start with so I’m not dealing with a big gluey mess, and the line helps me know where to stop with the first glue application so I don’t get too carried away.
Place the glued side of the liner paper on the inside of the tray, centering it from side to side, and leaving one-eighth to one quarter of an inch gap from the spine of the tray. Press it down with your fingers then use a bone folder to get all of it firmly adhered. The paper will be damp from the glue so use a barrier paper to protect the surface.
Turn the tray over and apply glue to the other side of the liner paper. Press this side down firmly. Weight this down and let everything dry thoroughly.
If you opt to glue this tray down to the base then you might want to make some adjustments to the size of the paper that you applied to the back of the tray and to the bottom of the box, or you could just glue it down as is.
Whatever you decide to do, this box is essentially finished.