Stab Binding
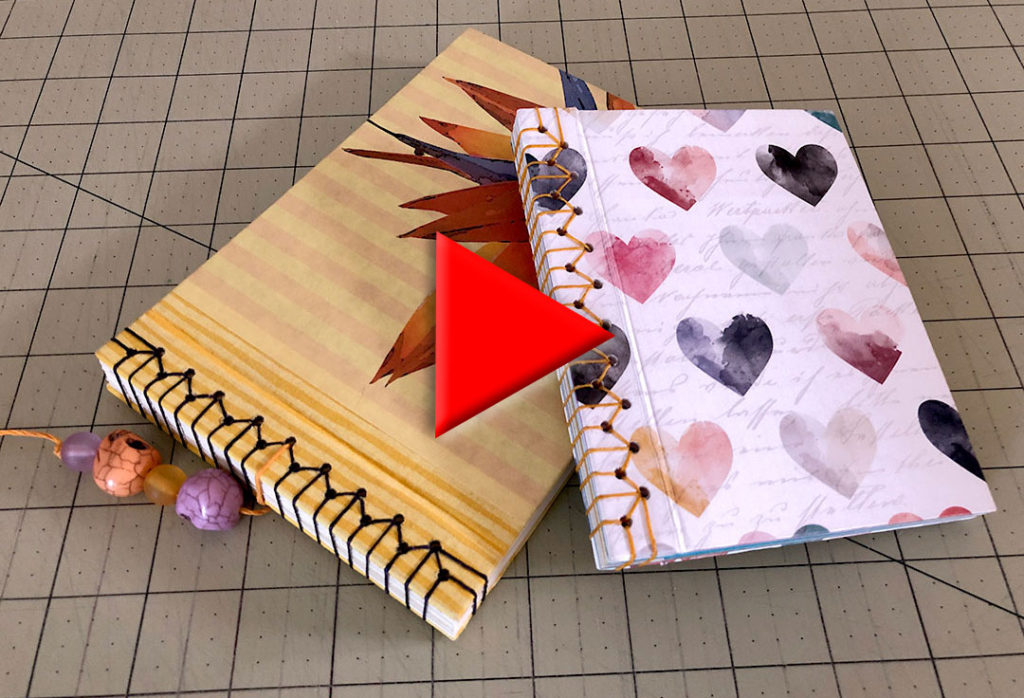
Click to Watch the Stab Binding Video Tutorial
Stab Binding
The Stab Binding stitch is a decorative stitch with lots of variations. You’ll also often see many examples of Japanese Stab Binding, of which there are at least four distinct patterns. This particular tutorial will show you one generic stitch, which will give you a basic understanding of what stab binding is all about.
The pages of a stab bound book will never open all the way and the book will not lie flat when open. Because of this, one of the standard features of all Stab Bound books is that the head and tail of the spine is sewn around, giving it this very distinct appearance.
Paper or Bookcloth?
Most instructions that you’ll see for stab binding books have the covers covered with paper inside and out, which means that the hinges are covered with paper. However, covering them this way keeps the book covers from opening very far. I think this makes the book so much harder to use. You’re either forced to live with the stiff covers or risk breaking them if you open them too far.
That’s what happened with this book. The temptation is to force the cover all the way back, and this snaps the paper, what my mother would have referred to as “breaking the back” of a book, when you break it’s cover. I even reinforced this particular hinge with a piece of linen tape underneath the paper, which is mostly what is holding it together now. But that didn’t keep the paper from splitting.
So, covering a stab bound book with paper inside and out allows the covers to open only so far, when ideally you want the covers to open all the way without having to break the hinge.
Bookcloth, for sure!
So, now I always use only bookcloth for the hinges. No exception. Watch my videos on making bookcloth here(“Make Your Own Bookcloth“) and here (“Designing, Printing and Making Your Own Bookcloth“).
The covers remain very flexible and will fold all the way over without issue. Plus the bookcloth is very durable compared to paper, and will survive hundreds of book openings and closings with no sign of wear.
What kind of paper for the pages?
Another thing that will help make your stab bound book more usable is if you use a lightweight paper. This makes the pages easier to turn. Also, if you think you are going to want to add items to your book that are going to increase the bulk, you can add spacers to give yourself room for those added items.
This tutorial is for the bookcloth version, the only kind of stab binding book I make now.
Make a plan
I always start by making a plan for all of the various parts and their sizes before I start any book. Here’s an example. This was my plan for the 5×7 Stab Binding book you see in this video.
Here’s a better look at the actual pieces that you’ll need to cut for this book, and a more formal version with all of the parts and sizes listed, if you plan on making a book this same size.
Make a sewing template
You’ll also want to make a template for punching the sewing holes. You’ll be punching holes in the paper, the covers and the spacers, if you decide to use those, and you’ll want all of these holes to line up. I make a template out of cardstock because it’s a little sturdier than plain paper and stands up to repeated use.
To create the pattern I’ve used on the book in this tutorial you’ll want to stagger the holes the way you see here. If you don’t want to figure out the spacing yourself you can download the template here: Stab Binding Sewing Template
Start with the bookcloth hinge
Start the construction with the bookboard and the bookcloth. You’ll also want some PVA glue, a brush and some scrap paper to glue on.
Make a gap spacer
Additionally, you might want to make a spacer to make it easy to measure the gap between the main bookboard and the spine piece. This isn’t necessary or required, but if you plan to make several books, taking the time to make these spacers will save you time later.
I just glue scraps of bookboard together until I have the thickness I want. I’ve created several of these in varying thicknesses that I can use for all of my book projects.
Align the spine piece and main bookboard
If you have a spacer, use it to align your main bookboard piece and the spine piece so they are 1/8th of an inch apart. If you don’t use a spacer just measure with a ruler or eyeball the gap. I use weights to keep the pieces from shifting once I have them where I want them. You can use a book or any heavy object to keep these pieces in place temporarily.
Start with the inner bookcloth
Once you have the correct space and the pieces weighted you’ll want the smaller inner spine piece of bookcloth. It should fit top to bottom without any overlap.
Place that piece of bookcloth wrong side up on a piece of scrap paper and apply PVA to the back side. Place this on the bookboard, aligning it top to bottom. The side-to-side placement doesn’t have to be perfect, but keep it from lapping over the outside of the spine piece. Aligning it close to that edge, but not right up to that edge, is fine.
Press the spine side down firmly and then press it into the gap with your bone folder before pressing it down on the main bookboard. You want it to go into the gap so that the hinge will be able to move back and forth freely. Once you have it pressed down into the gap, press down the bookcloth onto the main bookboard. Smooth all of this down using your bone folder and then pull the whole piece off of your work surface.
You’ll want to do this fairly quickly because you don’t want the glue in the gap to adhere to your work surface. Be sure to clean any residual glue off of your work surface before you continue.
The next piece to attach is the bookcloth that goes on the outside of the spine. This piece is larger and will overlap the head and tail of the book as well as the outer edge. It needs to be placed a bit more precisely, so I like to mark the margins on the back of the bookcloth before I add the glue. This allows me to place the bookboard exactly where it needs to go. Check to make sure your marks are correct before adding the glue.
Once again, place this piece wrong side up on a piece of scrap paper and apply PVA glue, making sure that the area inside the marks is thoroughly covered. You don’t need to apply glue all the way to the edges – you’ll glue these edges in a minute.
Place this piece on your work surface and align the correct side of the bookboard to the guidelines you have drawn. Press this down firmly, starting with the bookcloth that covers the gap. Use your bone folder to force the bookcloth into that gap and press it firmly to the bookcloth on the other side. This is the hinge and you want both pieces of bookcloth firmly attached to each other. Also make sure the bookcloth is firmly adhered to the bookboard.
Next you’ll trim the corners and glue down the margins. The corners need to be trimmed at a 45-degree angle. Make sure to leave about a quarter inch of bookcloth right at the corner. If you make the cut right up to the bookboard you won’t be able to fully cover the corner of the bookboard.
I make these corner cuts so often that I have made a template out of scraps of bookboard to cut against. This makes the process quick, easy and I get the perfect cut every time. If you plan on making a lot of books you should consider making yourself one of these handy tools.
Once you have the corners trimmed, apply PVA glue to the long margin, making sure you get coverage at the corners. Fold this edge over and pinch the excess at the corners, making sure to cover the bookboard at the corner.
Press this edge down firmly with a bone folder, smoothing down the corners you just pinched, as well.
Now apply glue to the two smaller edges. Fold these over and press down, being sure to press them into the gap. Use your bone folder for this and press the corners down firmly, as well. These two edges are both easier to fold over because you’ve already done the difficult part of creating the corners.
Put this cover under weight and follow the same procedure for the second cover. Be careful to get the orientation of the second cover correct, as it will be the mirror image of the first cover.
The next step is to apply the outside paper to the bookboard. You want this piece to lap over the edge of the bookcloth along the spine about ¼ of an inch. That should leave about 1 inch extra on the other three sides. I like to mark the margins on the backside of these pieces to make the placement easier once it’s covered with glue.
Apply glue thoroughly to the area inside the guidelines you’ve drawn. You don’t need to apply glue all the way out to the edges. You’ll deal with those later.
Carefully place the bookboard inside the guidelines and press down firmly. Turn the piece over and use a bone folder to press the paper to the board. Be sure to use a piece of barrier paper when you do this. The cover paper will be a little damp from the glue and you risk damaging it if you don’t protect it with a piece of scrap paper. Place this under a weight to dry while you follow the same process for the second cover.
Once you have the outside paper on both covers you’ll want to trim the corners at a 45-degree angle just as you did with the bookcloth. Don’t forget to leave a little extra at the corner so you can cover the corner of the bookboard.
After the corners have been trimmed, apply glue to the front edge, being sure to get glue on the excess by the corners. Fold this edge up and over the bookboard and pinch the excess at the corner making sure it is covering the corner smoothly, just as you did with the bookcloth.
Carefully press the corners and the flap down with your bone folder.
Then apply glue to one of the side flaps, folding it over and pressing it down firmly. Do the same with the opposite flap and place this cover under weight. Follow the same procedure for the second cover and put both covers under a weight and allow them to dry thoroughly.
The next step is to apply the endpapers to the inside of the covers. These endpapers should not fit all the way across the spine gap, but should sit about ¼ of an inch away from the spine edge as well as ¼ inch from each of the other three sides.
Place the endpaper wrong side up on a piece of scrap paper and apply PVA glue. Make sure you get good coverage on the edges, but don’t be too heavy-handed along the edges, as you don’t want glue squeezing out.
Carefully place it on the bookboard making sure it is straight and that your margins are even all the way around. If your paper has a design with an obvious direction to it, make sure you have it oriented correctly. Press this down thoroughly, making sure the edges are adhered. Place this under a weight while you work on the second cover. Allow both cover to dry completely, keeping them under weight while they dry so they will dry flat.
At this point both covers are done except for punching the holes. The hinges should be very flexible with nothing impeding them from moving freely back and forth.
The next step is to punch holes in your paper, spacers if you’re using them and the covers. You’ll definitely want a template for this step so if you haven’t made one yet, stop and do that now.
When making the decision about how big the holes need to be, keep in mind that the thread will pass trough almost all of the holes three or four times, so the hole needs to be big enough to accommodate the thickness of your thread that many times as well as the needle pulling the thread.
Once you’ve created your template mark and punch all of the items that will be sewn together. This includes both of your covers, all of your paper, and your spacers, if you are using them. As you punch the items, be careful to maintain the correct orientation after they’ve been punched so that everything lines up correctly when you start sewing.
Once you have everything punched you’re ready to put it all together, getting it prepared to sew. If you are using spacers place those in between the pages that you want extra space between. This doesn’t necessarily have to be every single page, but it can be, if that’s what you want.
Jog the paper and the spacers together, making sure all of the holes line up correctly. I will often use a needle to run through a couple of the holes to make sure they’re aligned and to find any errant pages or spacers.
Once the pages are aligned add the covers and follow the same process, making sure all of the holes are lined up. Again, I use a needle to make sure of the alignment, but I also add a small piece of thread. Once I have the holes aligned I run the thread all the way through and tie that area together with a simple bow knot. I do this on both ends and in the middle to ensure that everything is aligned and stable. This is just a temporary way to keep everything aligned until I clamp it all down.
You can use clamps or large binder clips for this step. Regardless of what you use, protect the cover of your book with padding between the clips and the cover so you don’t mark or dent the cover. I just use double layers of heavy blotter paper as a buffer between book and clamp.
Once you have it clamped you can remove the tie in the center of the spine. This is where you’ll start sewing. Leave the ties on the ends for now.
Measure out your thread. I don’t like to have to add thread for this binding stitch, so I try to make sure I have enough right from the start. I measured out about 12 times the width of the book, plus some extra.
Use waxed thread for this if you have it. Using waxed thread allows you to deal more easily with long stretches of thread because it doesn’t tangle as easily as un-waxed thread.
Thread your needle and now you’re ready to sew. I’ll use this simple diagram as a reference so you can tell which hole I’m referring to.
Start sewing in one of the center holes in the second row – hole #1 in my diagram. Bring your thread from the back of the book to the front, leaving a long tail of four or five inches.
Now sew down through the hole closer to the spine edge, hole #2 in my diagram. That lose tail tends to get in the way while I’m sewing so I anchor it under one of the clamps to keep it out of my way.
Bring the thread up and around the spine edge and then back down through hole #2 again. As you are making these stitches, pinch the spine together so you can make your stitches nice and snug.
Bring the thread up through hole #3 and down through hole #4, and then up and around the spine and back down through hole #4.
You can see the pattern that is starting to develop. You’ll follow this same pattern all the way up to the head of the spine. Here’s what it should look like at this point, front and back.
Once you get to the head of the spine you want to wrap your thread around the head of the spine and sew back down into that top hole – hole #6 on my diagram. Be sure to remove the temporary holding thread that you had tied there originally to hold everything together. Wrapping the thread around the head and, eventually the tail, of the spine like this is the hallmark of stab binding.
Next you will bring your needle up from the back of the book through hole #5, around the head of the spine again and then back up through hole #5.
Next you’ll go straight around the spine edge and up through hole #5 yet again, and then down through hole #4.
Come back up through hole #3, go around the spine and then back up through hole #3 again.
By the way, hole #5 will have 4 different threads coming out of it or going into it. This only happens at the corners. The other holes will only have two or three threads coming from them.
Also, you will never have a double set of threads going to the same place from any hole, so if this happens you need to back up and see where it went wrong.
Continue to follow this pattern as you work your way back to the center. Once you get to where you started you will work your way to the other end of the spine following the first sewing pattern – sewing up through the back hole, down through the hole closer to the edge, around the spine and back down through the same hole near the edge.
Here’s that diagram again for reference.
Once you get to the tail of the spine you will create the same pattern that you made at the head of the spine. After you sew around the spine from that very last hole – hole #11 in my diagram – you’ll sew around the tail of the spine and then back through that same hole again. Keep these stitches snug.
Then, sew back up through hole #10, around the tail of the spine again, and then back through hole #10. This is the hole that gets sewn through 4 times. Once you come back up through hole #10 sew around the outside of the spine and back up through that hole for the last time.
Now start working your way back up the spine, starting by sewing down through hole #9 and up through hole #8. Go around the spine and back up through hole #8.
Continue following this pattern until you’re back in the center of the spine where you started.
Once you’re back where you started you’ll want to tie off the loose ends. In my example here I’m going to tie this off without finishing the last stitch around the spine because I’m going to do that with a different colored thread and some beads for embellishments.
So, first, I’ll show you the normal way to finish this off on another book. Your last stitch as you work your way back to the center will be coming up out of the same hole that you started in, where the original tail is still hanging out of. So, your needle will be at the front of the book and the tail will be at the back of the book.
Wrap the thread around the spine one last time and tie the thread tightly to the tail in a double knot, as close as possible to the hole. The final step before you trim your thread is to sew back through that same hole and pop the knot inside the hole so it’s not visible from the outside.
Trim your threads and your book is done.
The only thing I did differently on the other book is I tied it off before doing that final wrap around the spine. Again, I tried to keep the knot as close to that last hole as possible so I could pop the knot inside, before cutting my threads, so the knot wouldn’t show.
Then, I sewed through that same hole and around the spine with a different colored thread, tying it off and hiding the knot, and then added some beads to the thread for a little extra decoration.
So there you have it. That’s one way to make a book with a stab binding.