Making a Soft Book Cover
Click to Watch the Soft Cover Video Tutorial
Marine vinyl and faux leathers come in a huge variety of colors and textures, and are great for making soft book covers for a wide variety of books, including wrapped journals and books bound with a long stitch. You can see video tutorials about both of those binding techniques here: Faux Leather Wrapped Journal & Simple Long Stitch Binding
All of these materials have one common downside. The wrong side of these fabrics is always an unpleasant woven material stamped with text or a design, or an unattractive fuzzy material. In either case it’s not something that you’d want showing on the inside of your book cover.
This tutorial will show you two ways to deal with adding fabric to the wrong side of the vinyl to cover up that unattractive side.
In both cases you’ll want to find a piece of fabric that contrasts with or complements the outside layer.
The first technique uses PVA glue to adhere the two pieces of material together.
The second method shows how you can sew the pieces of material together without first having to glue them together.
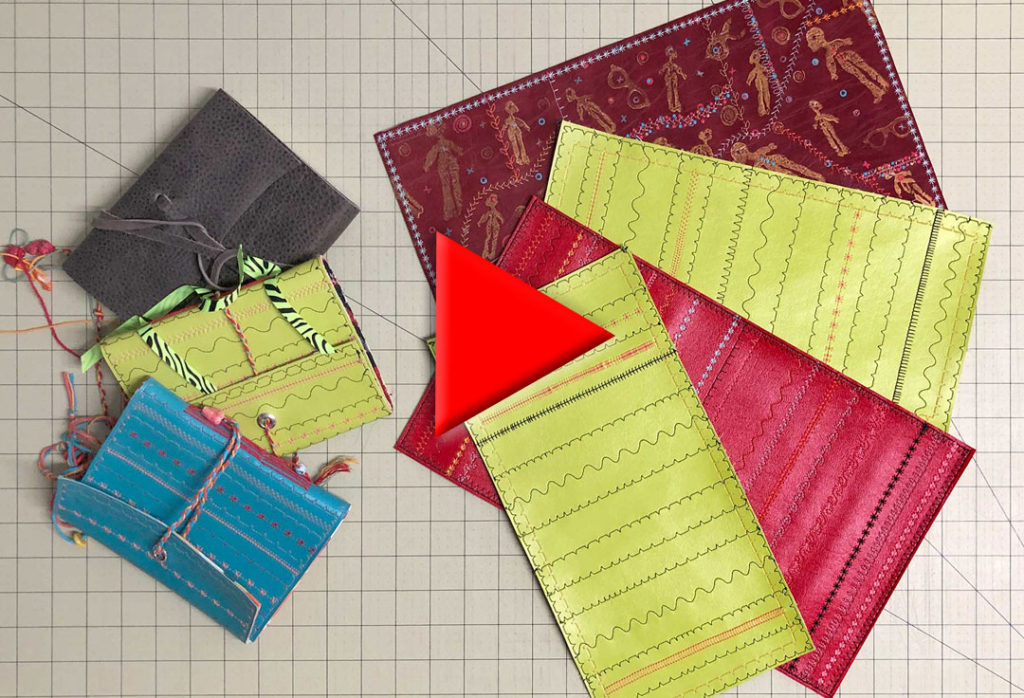
Although the second method requires that you sew the two pieces together, even the first method gives you the opportunity to add some additional decoration to your cover by means of sewing, as in this example which was first glued and then sewn over just for the decorative effect.
You can do this sewing by hand but a sewing machine certainly makes the work go faster. Plus, if you have a machine that has a lot of different stitches, it gives you a chance to use some of those. 🙂
First, you’ll need to figure out approximately how big you want your book to be.
As an example, if your signatures are 8 ¼ x 5 ¾ then allow 1/8th of an inch top and bottom. So, that makes the height 8 ½ inches. Double the width of your signatures (5¾ times 2 equals 11 ½) and add the width of the spine, which would be the thickness of your textblock. You’ll probably want to add a flap, so add the width of the flap. The flap measurement is whatever you want it to be, and also allows for you to be loosey-goosey on the overall width of the cover. I allowed two and a half inches for the flap, which would make my example cover measure 14 ½ x 8 ½.
In the case of the glued example you’ll want to cut both the vinyl and the fabric several inches larger in both dimensions than the end result. Once it’s glued and dried you can cut it to size. In the case of the sewn example I usually cut the vinyl to the finished size, but allow for at least an extra inch of fabric all the way around.
Of those two main methods I’ll start with the gluing technique. The advantage of this method is you don’t have to worry about the edges of the fabric fraying, because they are firmly glued to the vinyl.
If you use this method you want to be sure to use PVA glue and not substitute something like Elmer’s glue. PVA glue remains flexible once it’s dry and that feature is critical to the construction of a soft cover. Elmer’s glue, in addition to not being PH neutral, becomes brittle after it dries, and you won’t be happy with the result.
You can use a brush or a foam roller to apply the glue, but a roller gives you a thinner, more even layer of glue, which keeps the glue from seeping through the weave of the thinner fabric that you’ll attach. If you do use a brush, be sure not to leave any globs of glue.
And be prepared to use quite a bit of glue for this process, as the fabric backing of the faux leather, in particular, will really soak it up. Don’t be stingy with the glue – you want these two pieces of fabric to stay firmly together, forever.
Once you have the backing covered very thoroughly with glue, position the fabric face up and smooth it out so there are no bumps, bubbles or wrinkles. I like to use a clean rubber roller with some moderate pressure to make sure all of it has been pressed firmly together. Don’t press overly hard though. Once again, you don’t want to force glue through the weave of the fabric.
Turn the whole piece over and clean off any glue that might have gotten on the other side and then put it under a weight to dry. I’m just using the same glass shelf that I glued it on here, but you could use books, or any moderate weight that you have around. To speed up the drying process I often sandwich the material between thick blotters to help absorb the moisture.
Once the cover has dried you can cut it to the precise measurement that you already figured out for your cover. In the case of my example that would be 14 ½ x 8 ½. By the way, if you don’t know how to make a textblock and you want to learn how to do that you can watch the video here:
The second method involves sewing the pieces together without first gluing them. The main advantages of using this method are that you don’t have to deal with the mess of gluing and you don’t have to wait for the pieces to dry. The main disadvantage of this method is that you have the potential of the edges of the fabric fraying.
There are at least four ways you can deal with those edges on the fabric. You can choose to do nothing and expect that they will fray a little bit. You can fold the edges over and sew those as you would a seam allowance or hem. You can use the stitches on your sewing machine to sew over the edges, like a blanket stitch. I don’t have an example of that because I don’t do that, but it’s definitely an option. Sewing along the edge like this is about as close as I come to this blanket stitch idea, but edging like this won’t really keep the fabric from fraying.
And, lastly, you can apply a very light layer of fabric glue or PVA to seal the edges and keep the fabric from fraying. Both kinds of glue dry clear and the fabric stays flexible, but when I choose this option I always opt for the PVA glue. Fabric glue, at least the stuff I have, is acetone based so it’s hard to clean up after. It sticks to my fingers and it’s hard to get off, since water doesn’t work on it. PVA glue, on the other hand, is water based and washes or wipes right off as long as it’s still wet. It’s so much easier to use.
Of all of those options I tend to do either nothing at all, and let it fray a little, because this is sometimes appropriate for the book I’m making, or I glue the fabric to the vinyl. Try them all and you’ll discover the methods you like best.
So, now let’s get to the sewing part.
No matter what you decide to do with the edges, and whether you have glued your fabric together or not, you will immediately discover that you have an issue when trying to sew fabric and vinyl together.
If the two layers are loose the fabric layer will start to bunch up and pucker as you sew, no matter how hard you try to keep the material smooth.
If, instead, the layers are glued together, which will keep the fabric layer from bunching up like the previous method, you will still notice that your stitches are not coming out correctly. They are probably bunching up and not spacing themselves correctly. All of this behavior is caused because the vinyl is slipping under the presser foot.
Your regular sewing machine set-up has teeth on the bottom presser foot, called a feed dog, that helps feed the fabric through. Unfortunately when you are sewing vinyl to fabric what happens is it feeds the bottom fabric through but the upper foot just slips on the vinyl. That’s how the puckering occurs or, in the case of the example I showed of the vinyl glued to the fabric, the stitches can’t regulate themselves correctly.
The key to your happiness lies with a very cheap device for your sewing machine called a walking foot. If you happen to be a quilter you are probably not only familiar with this but you almost certainly have one. For those of you without, they are easy to find at a sewing or craft store, or on amazon. I’ll put a link in my description below.
A walking foot works because it has teeth on the top feed dog, to match the teeth on the bottom feed dog. So, the bottom and the top are being pulled at the same rate keeping your fabric smooth and your stitches even. You can try to create these vinyl/fabric covers without this walking foot, but I guarantee you will become frustrated with the result.
Once you replace your regular presser foot with the walking foot, sewing the fabric and vinyl together will become quite simple. If I am sewing two loose pieces together I might tape them together initially, using a gentle painter’s tape, like Frog tape, just until I get the first stitches down, but even this is probably unnecessary. If I’m sewing straight lines, as I’ll be doing on this example, I use another piece of tape as a guide, just to keep my lines straight.
Once you start using the walking foot, just let it do its thing. You can guide your fabric to make sure it’s going where you want, but don’t try to push or pull on it. Let the walking foot do its job.
You can see how, after sewing only two lines, how nice and smooth everything is, front and back.
I’m pretty random when I make these covers. I usually don’t have much of a plan in mind when I start, just a general idea of whether I want to just have straight lines, or something a little more organic, like this example.
If I know I’m going to put a border all the way around the cover, I usually sew a number of straight lines across the whole piece, just to make sure that the material is anchored down all the way across.
If the two pieces are glued together, like this example, I don’t worry about that since the fabric is already anchored, and in that case I’ll sew the border first.
Once you’ve sewn the border you can trim away all of the excess fabric.
If the two pieces are glued together, like this example, I don’t worry about anchoring the pieces together with stitching, since the fabric is already anchored. So, in that case I’ll usually sew the border first.
A few other tips, in no particular order.
Lots of different fabric paints work great on vinyl and you can use them with rubber stamps, which is what I did on this cover.
These paints come in lots of great colors and there are many different brands, so be sure to test them on a scrap first, just to make sure they’re compatible.
If you want to use your own handmade stamps, here’s my video showing how to make your own.
And here’s another little tip that I learned from being a quilter. I don’t like all the loose threads that I end up with from sewing lots of different lines of stitching. Under normal circumstances, if I were sewing a hem or a seam where it wasn’t going to show, I would just backstitch a few stitches to keep the thread from unraveling and then clip it. However, with these covers every stitch shows, both front and back, and with these decorative stitches, they don’t stitch backwards very gracefully anyway.
So, on the fabric side of the cover I pull lightly on the back thread to pop the last stitch, forcing the thread on the other side to loosen up. Then I pull the other thread through to the backside and tie it off manually and then clip it. It’s a bit more work, but the end result looks a lot neater.
So, those are some of the techniques I use to make soft covers for my books.